Jump to content


Photo
* * * * * 2 votes

Flexible Solar Panel Installation

Solar panel flexible

  • Please log in to reply
39 replies to this topic

#21 Zirdu

Zirdu

    Senior Member

  • Members
  • 110 posts
  • LocationSt. George, UT

Posted 03 December 2017 - 01:23 AM

I am very satisfied with my solar panel mounts.  I have driven to California and back and all around Nevada and Utah this summer.  The only issue I noted was that one night with a strong cross wind, the roof made some popping sounds.  This doesn't happen driving down the road at 75 mph.   It seems like only a strong cross wind causes the noise.  Others have noted this issue, expecially with the Grandby, with the longer roof.  I don't think it is a problem, just a very minor annoyance under certain weather conditions.


I would not change the screw fastening into the tubing or the tubing size.  I did notice that Home Depot or Loews does sell a 3/4 inch square tubing, which might also work well.  The small tubing supports in the middle of the panel is just to provide a little support and to prevent sagging.  I did NOT put screws in the middle of the panel, just used VHB to attach the center square support to the roof, and sikaflex to attach to the panel.  If I have to remove, ii should be easy enough to lift up and remove the center support with a knife.  So far that center support is still very solid.


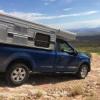
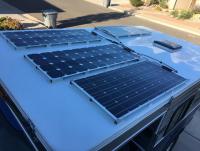
As noted, I did add two more panels to my roof.  In the picture below, the new panels are the shorter ones.  They might look wider, but all four panels are exactly the same width.  


14 - 1 (2).jpg


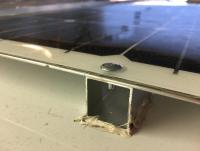
In these 2 new panels, I used a slightly different method to stiffen the sides of the panel.  Instead of a 1 inch by 1/16 inch flat bar, I used a angle piece of 1/2 inch per side, by 1/20 inch, with one side sticking up.  


14 - 1 (1).jpg


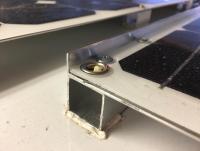
I had to use small 1/2 inch flat pieces to build out the bottom to make for solid platform for attaching to square tubing.


Finally, here is a detail of the screw in the center front mount.


14 - 1.jpg


The weight of the flexible panels alone is about 4 pounds.  The total weight of the mounting, including all tubings, bars, screws,  VHB tape, etc, is 1 1/2 pounds, so the total weight of the panel with all mounting is 5 1/2 pounds.   I have no problem lifting the roof of my Grandby myself  (age 71) with the extra 22 pounds.   (I do have the exterior lifter things.)


Edited by Zirdu, 03 December 2017 - 01:47 AM.

  • 0

#22 bike4mee

bike4mee

    Senior Member

  • Members
  • 169 posts
  • LocationDurango Colorado

Posted 03 December 2017 - 01:42 PM

This is nice but I try to park in the shade and if you have SUP's/ things carried on your roof you get shadows. From what I understand any shadow on a solar panel will stop the flow of electricity. I need a rollup soar panel that I can have on a leash to be placed in the sun. Is there a thread for that type of solar setup? 


  • 1

#23 ckent323

ckent323

    Senior Member

  • Members
  • 1,227 posts
  • LocationSolvang, CA

Posted 03 December 2017 - 06:17 PM

Bike4mee,


You are correct that shade, even a small amount of shade on a solar panel can significantly reduce its performance.


However, an upside to the solar panels that are mounted with a small air gap between the panel and the camper roof (typically rigid panels) is that they shade the camper roof and significantly cut down on the heat load.


Craig


  • 0

1993 Dodge Cummins W-250 Club Cab long bed, 2007 FWC Keystone


#24 Karlton

Karlton

    Senior Member

  • Members
  • 171 posts
  • LocationSouthern Idaho

Posted 12 February 2018 - 08:13 PM

I like the mounting method.  Thanks, Zirdu for posting.  What solar controller are you using for the system?


  • 0

2019 Silverado 2500HD, 2017 Hawk


#25 Karlton

Karlton

    Senior Member

  • Members
  • 171 posts
  • LocationSouthern Idaho

Posted 12 February 2018 - 08:18 PM

I like the mounting method.  Thanks, Zirdu for posting.  What solar controller are you using for the system?


Found it in another post on the topic!


"I wired the two in series, making the supposed maximum voltage of 45.6 volts.  These are wired into a Victron100/300 MPPT controller. The 100 means it can take up to 100 volts max input, and the 30 means it can output up to 30 amps. "


  • 0

2019 Silverado 2500HD, 2017 Hawk


#26 Vic Harder

Vic Harder

    Doctor Electric

  • Site Team
  • 4,980 posts
  • LocationCalgary, Alberta

Posted 12 February 2018 - 10:36 PM

Victron makes great gear.


  • 0

#27 Zirdu

Zirdu

    Senior Member

  • Members
  • 110 posts
  • LocationSt. George, UT

Posted 24 April 2018 - 01:08 AM

As I noted in my initial post, I tried to make the installation somewhat reversible, so that if I had to, I could remove and replace the panels.  I didn't expect to have to do this, but as I noted on another post, I damaged the panels by driving into my garage with the back of the roof up.  This scraped off the connector on the top of two of the panels.  I tried to repair them by soldering them back together, but I was ultimately unable to fix one of them.  It had torn off the small connector below the plastic, and I just couldn't get to it to solder it back.  


So I just went through the trouble and expense of removing and replacing one of the 120 watt flexible panels.  It was fairly easy to do.  I just unscrewed the panel, and then carefully cut it off the mounts, leaving the mounts mounted securely on the roof.  In doing this, I noted how securely the mounts were mounted to the roof.  They are not coming off unless I do a lot of work to cut them off.


I then cut off the wires and removed the old panel.  I prepared the new panel by securing 1/2 inch by 1/20 inch angle aluminum on the sides, and 1 inch by 1/16 inch on the front and back with VHB tape.   I then secured the new panel onto the mounts with a little Sikaflex 221 and weiighted it down for a few hours for the Sikaflex to set up.  I then screwed the panel down to the existing mounts with #8 x 1/2 inch self drilling Lath Screws.  


Hopefully this will be the last time I have to do this!  So far, everything works pretty much in accord to expectations.  


  • 0

#28 pghjon

pghjon

    Member

  • Members
  • PipPip
  • 13 posts
  • LocationUSA

Posted 26 April 2018 - 05:38 PM

The new panels FWC is using supposedly work better in shade.


https://overlandsola...wer-gen-3-panel


  • 0

#29 moveinon

moveinon

    Senior Member

  • Members
  • 156 posts
  • LocationMilwaukie Oregon

Posted 26 April 2018 - 07:51 PM

I have a 160W Zamp suitcase portable I bought used off of CL pretty cheap.  It is made in Bend, Oregon and is very solidly built and can easily be set up and tilted at whatever angle best takes advantage of the sun.  I clamp in on my aluminum roof rack when in transit or camped in the sun and it functions just like a fixed roof top solar panel.  But like others have said I try to camp in the shade a lot of the time and in that case I just unclamp it from the roof rack, plug it into the back of the Fleet, add the extension cord and use it as a portable out in the sun.  Kind of the best of both worlds.


  • 0

#30 pvstoy

pvstoy

    Senior Member

  • Members
  • 2,775 posts
  • LocationCarson City, NV

Posted 26 April 2018 - 07:58 PM

Ok I will double post here also info what FWC is using . Other post "What brand is the 160 watt solar panel fwc provides"


http://www.wanderthe...e-5#entry195051


Posted Today, 12:50 PM

I can answer that question for you.  I was at FWC last month and saw the new panel that is being installed.  I was impressed and contacted Overland Solar for details.


I talked to Rando and he pointed out that the specifications provided on the web page is wrong.  So talking to Brian at Overland Solar I got the corrected specifications.


22 X 57.25 inches

7 Pounds

Pmax 160W

32.2 Voc

27.3 Vmp

Isc (A) 6.8

Imp (A) 5.83


FWC started installs at the beginning of the year when the new owner took over. Mainline Overland also stocks the panels. 


How they are mounted is a aluminum frame with a air gap under between the roof and aluminum angle.  On the long sides there are 5 metal grommets on each side and screws are used to attach to the aluminum frame.  There has been lots of testing to see if there needs to be a thin backing plate to prevent warping or sagging.  As it turns out they are ridged enough that nothing is needed.  But a caution for my install for mounting the panels North / South  between the two roof vents was air flow getting under the panels while driving.  If I do see any wind ( not likely) then a simple poly air deflector will solve it.


I ordered 3 panels and since they have a higher voltage I'm choosing to use a MPPT controller and wire them in parallel to get more amps.  Also Overland Solar provides 90 degree SAE plugs to FWC.  


Talking to Brian at Overland Solar I was impressed with his customer service.  They live off the grid and use and test their products.  They are busy and travel a lot to shows and events where I needed to leave a message and they will get back when available.


Hope that answers your questions.....


  • 0

Patrick

2015 FWC Hawk Flatbed


0 user(s) are reading this topic

0 members, 0 guests, 0 anonymous users