and this made a difference? strange. can you trace/see the wires to confirm there is nothing else in the circuit path?


Charge controller won't stay in float
Started by
radarcontact
, Sep 26 2018 03:21 AM
59 replies to this topic
#41

Vic Harder
-

- Site Team
- 4,968 posts
Doctor Electric
- LocationCalgary, Alberta
Posted 07 October 2018 - 04:38 AM
2015 Silverado 3500 crew cab 8' bed Diesel
2012 ATC Puma Shell build - https://www.wanderth...012-puma-build/
Power considerations thread - https://www.wanderth...e-power-scotty/
Building out an electrical system - So, you want to setup a good electrical system in your camper? - Electrical, Charging, Solar, Batteries and Generators - Wander the West
#42
radarcontact
-
- Members
- 195 posts
Senior Member
- LocationWyoming, USA
Posted 07 October 2018 - 02:12 PM
and this made a difference? strange. can you trace/see the wires to confirm there is nothing else in the circuit path?
It definitely made a difference. Not sure why. Unfortunately, I can't trace the wires behind the cabinet. There's an area from the camper battery to the separator I can't see. Electrically, it probably shouldn't have made a difference...but I can tell you for certain that when I removed ALL wires from the separator (i.e., after I disconnected the engine battery from the separator) and took it completely out of the equation, the controller behaved differently.
I'm not sure if I've solved the problem. It's going to be one of those situations where I'll have to observe over time and see what happens. The last two days have been good...controller is floating as it should. As I mentioned before, I believe the algorithm for this component (probably the same for other controllers' microprocessors) needs time to learn a system. Your suggestion of reducing the float transition current setpoint is allowing the controller to stay in absorption mode longer. That longer period, I think, is allowing the controller to figure things out, as well as pump some additional amperage into the battery before it tries to float.
I'll continue to monitor and look for changes and problems. Thanks again for your good help.
Forgot to mention....when I attach the thermocouple, the controller still has trouble floating at times...it wants to float at a higher voltage than 13.5V. The thermocouple wasn't the major problem, though...I've tested the system with and without it, and was getting the poor results in either case prior to removing the separator. My EE friend has a multimeter with an attachment that can sense current in the thermocouple - he thought there might be a problem w/it, Blue Sky is sending me a new one...along w/a replacement battery monitor, just to make sure there's no issue w/the controller/monitor interface. They've been a very good company to work with, and want to help me resolve this issue.
Edited by radarcontact, 07 October 2018 - 02:18 PM.
#43
radarcontact
-
- Members
- 195 posts
Senior Member
- LocationWyoming, USA
Posted 20 October 2018 - 11:34 PM
Anyone still reading this blog....I solved my problem today, finally....over a month of frustration. And the solution, as you would expect, was simple.
To Vic and everyone else who were puzzled by what I thought was my 'solution', you were right - the battery separator et al wasn't the solution. Tricked me, because everything seemed to work right after I rewired the separator, but soon enough everything went back to haywire. Controller wouldn't float.
Went back to the most basic connection, for the nth time. PV----------->controller------------------>battteries. Nothing else. Used alternate wiring for this connection, from both PV to controller, and controller to batteries. Still wouldn't float. My conclusions were:
1) PV panels are faulty/shorting. Checked voltage at each panel, OK.
2) controller is faulty - not likely, as this was the third one Blue Sky sent me.
3) batteries. Brand new, but maybe one was bad...?
So, as some of you advised here, I went out and bought a hydrometer. Checked voltage at each battery, 6.43V, identical. Checked specific gravity with hydrometer, all cells good.
I hooked up the controller to my truck battery...controller worked like a champ. NO PROBLEMS. So, what to do?
My conclusion at this point was that, for some reason, the controller wasn't playing well with two 6V batteries in series, as it seemed to be very happy w/my 12V truck battery. Why?
Don't ask me why I never considered this as a problem, but I took a look at my series wire, i.e., the - to + wire connecting the two batteries. It's only a foot long - but when I looked at it, I noticed that the GAUGE wasn't all that big. Looks like 8 AWG. I didn't install that connecting wire, BTW....an RV guy did it here in Jackson when he was fooling around w/my electrical last year, and sold me these batteries.
So, I ran over to NAPA and bought a heavy gauge (4 AWG) battery wire, 12 in long. Couldn't be that simple, right? Well, call me a dumbass for screwing around w/this over the last month or so and not thinking about the gauge of that wire, because, as soon as I installed it and reconnected everything, it worked like it should.
Want to thank everyone who pushed me to pay more attention to the BATTERIES....should have listened to you guys. When in series, use a heavy gauge wire to connect the batteries. Lesson learned LOL.
Edited by radarcontact, 20 October 2018 - 11:40 PM.
#44
pvstoy
-

- Members
- 2,772 posts
Senior Member
- LocationCarson City, NV
Posted 21 October 2018 - 12:00 AM
Anyone still reading this blog....I solved my problem today, finally....over a month of frustration. And the solution, as you would expect, was simple. ......
.......
.........................
So, I ran over to NAPA and bought a heavy gauge (4 AWG) battery wire, 12 in long. Couldn't be that simple, right? Well, call me a dumbass for screwing around w/this over the last month or so and not thinking about the gauge of that wire, because, as soon as I installed it and reconnected everything, it worked like it should.
Want to thank everyone who pushed me to pay more attention to the BATTERIES....should have listened to you guys. When in series, use a heavy gauge wire to connect the batteries. Lesson learned LOL.
.
.
Electrical problems ARE one of the hardest things to trouble shoot and fix. It can be a vast amount of possibilities and one needs to work at it in a patiently way.
So glad you have a fix to your long battle!!! Thanks for sharing the possible fix as others can learn from you.
Hard to believe that 8 gauge wire that short would mess with the system unless the cable had a short inside or bad terminal ends... could you have a look at it? Attach a OHM meter to both ends and twist it around and see if the OHMS go off zero.
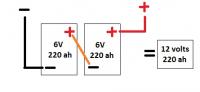
Make sure all your positive and negative attachments are attached to the post that does not have the series jumper cable as in the picture.
.
Patrick
2015 FWC Hawk Flatbed
#45
radarcontact
-
- Members
- 195 posts
Senior Member
- LocationWyoming, USA
Posted 21 October 2018 - 12:45 AM
Patrick....I will have another look at the wire in the next few days, and report back - not home at the moment, and that's where the old wire is. I want to double check the gauge as well.
Pardon me for sounding like an idiot (I'm really not, but haven't messed w/EE stuff for a long time til now), but tell me exactly what/how you want me to test the wire...? Reconnect it to the batteries, and how do I test it w/my voltmeter? I've checked volts and amps w/it, but not resistance. Thanks!
#46
pvstoy
-
- Members
- 2,772 posts
Senior Member
- LocationCarson City, NV
Posted 21 October 2018 - 01:03 AM
Sure no worries,
Put you volt meter selection on the 20k OHM selection. When you do you will see like 1 . On the display. When you touch the probe ends together you will see 0.00 on the display.
Put a end of the meter on each end of the battery wire ends. You can use closepins binder clip or tape to keep them there as you do the next step
You should see the meter showing again 0.00 as it should just be a extension of the probes. If not there is a short.
Now grab one end and the wire next to it and tug in and out and watch the meter to see if the numbers go off of 0.00. Do the other end
Now grab near both ends and twist pull, push the wire and note if at any time it goes off 0.00. This will show if the wire has broken strands inside the wire casing.
Patrick
2015 FWC Hawk Flatbed
#47
radarcontact
-
- Members
- 195 posts
Senior Member
- LocationWyoming, USA
Posted 21 October 2018 - 01:09 AM
Will do, thanks, will report back. Want to double-check the gauge of the wire...I was amped up about replacing it, so I might have mis-gauged it, it might be a 10 AWG. But I'll find out. After I do the resistance test I'll cut it and see if the copper (if that's what's in it LOL) is the gauge that matches the insulation.
#48
pvstoy
-
- Members
- 2,772 posts
Senior Member
- LocationCarson City, NV
Posted 21 October 2018 - 01:18 AM
If the gauge is too thin then it would have a problem for those big 6 volt batteries talking to each other in series That would delay the flow and the controller would see one voltage and then as the battery's equalize the controller would see different voltage. And perhaps is where your endless cycle loop was created.
Patrick
2015 FWC Hawk Flatbed
#49
Vic Harder
-
- Site Team
- 4,968 posts
Doctor Electric
- LocationCalgary, Alberta
Posted 21 October 2018 - 03:48 AM
If the gauge is too thin then it would have a problem for those big 6 volt batteries talking to each other in series That would delay the flow and the controller would see one voltage and then as the battery's equalize the controller would see different voltage. And perhaps is where your endless cycle loop was created.
I like this theory.
Only way to know for sure is to make up a new wire of an even smaller gauge (to exacerbate the problem) and try it.
2015 Silverado 3500 crew cab 8' bed Diesel
2012 ATC Puma Shell build - https://www.wanderth...012-puma-build/
Power considerations thread - https://www.wanderth...e-power-scotty/
Building out an electrical system - So, you want to setup a good electrical system in your camper? - Electrical, Charging, Solar, Batteries and Generators - Wander the West
2012 ATC Puma Shell build - https://www.wanderth...012-puma-build/
Power considerations thread - https://www.wanderth...e-power-scotty/
Building out an electrical system - So, you want to setup a good electrical system in your camper? - Electrical, Charging, Solar, Batteries and Generators - Wander the West
#50
radarcontact
-
- Members
- 195 posts
Senior Member
- LocationWyoming, USA
Posted 21 October 2018 - 03:10 PM
Well, as the saying goes, if it's too good to be true....
Pulled camper out of garage this AM, and it went back to its cycling thing.
Hard to figure, as yesterday it performed flawlessly for hours after I replaced that wire. I changed settings in the controller on the fly, it responded perfectly. No problems. Today, back to square one.
Has to be 1)a battery is bad, though they both checked out fine, or 2) the controller just doesn't like dealing with 2 6V batts in series.
Temp was warm here yesterday, but cold this AM...don't know if that has anything to do with it.
I'm done with this for now. Too much wasted time invested, with no consistent results. Out of options to try. Thanks for the support, much appreciated, even though the results weren't favorable.


0 user(s) are reading this topic
0 members, 0 guests, 0 anonymous users

