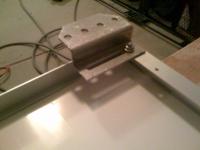
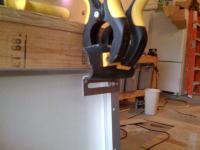
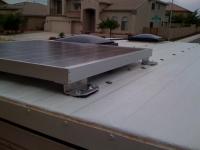
Jump to content


Photo
- - - - -

Panther Solar Install


  • Please log in to reply
16 replies to this topic

#1 ScottBailey

ScottBailey

    Senior Member

  • Members
  • 649 posts
  • LocationMesa, AZ

Posted 25 May 2009 - 11:49 PM

Installed a 65 watt solar panel.

Pictures:
  • Feet on the panel.
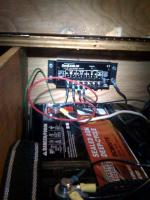
  • Wires in the box. (I closed the conduit hole w/ some aluminum & 3M 5200, drilled small hioles for the 14 gauge wire and sealed w/ 5200.)
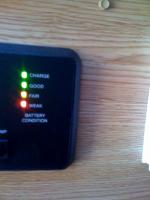
  • The Morningstar controller. The solar negative (-) was tied to the frame.

Attached Thumbnails

  • atc_solar_01.jpg
  • atc_solar_02.jpg
  • atc_solar_03.jpg

  • 0

Scott Bailey -- W7SEB
2007 F350 XLT Diesel CC SRW SB 4x4
Cheap tent and a Partner Steel stove. 
Future? Really like the Hiatus, but I'm broke AF, so dreaming about a DIY.
SOLD: 2008 ATC Panther:dinette, 5th wheel


#2 ScottBailey

ScottBailey

    Senior Member

  • Members
  • 649 posts
  • LocationMesa, AZ

Posted 25 May 2009 - 11:51 PM

I made "gaskets" for the feet with some spare heater hose.

Attached Thumbnails

  • atc_solar_04.jpg
  • atc_solar_05.jpg

  • 0

Scott Bailey -- W7SEB
2007 F350 XLT Diesel CC SRW SB 4x4
Cheap tent and a Partner Steel stove. 
Future? Really like the Hiatus, but I'm broke AF, so dreaming about a DIY.
SOLD: 2008 ATC Panther:dinette, 5th wheel


#3 ScottBailey

ScottBailey

    Senior Member

  • Members
  • 649 posts
  • LocationMesa, AZ

Posted 25 May 2009 - 11:59 PM

The first picture shows the wiring. Negative (-) is tied into the frame through an existing screw while positive (+) runs through ATC's prewire. I think ATC normally prewires in the front. I like the solar panel in the rear, easier to lift. And, yes, this panel is easy to lift. Note, added the 5200 on the existing screw head AFTER the picture.

The second picture shows the battery is charging! Check this out before you bolt your solar panel in, since it'll be impossible to problem solve later!

The third picture shows the panel in place and bolted down. The gaskets were drilled w/ a 1/4 inch bit, maybe larger (same size as the foot holes have). After positioning the gasket, I filled the hole w/ 5200, put a 1" screw w/ a washer through 2 of the holes, and then -- after the picture -- applied 5200 to the screw head.

Attached Thumbnails

  • atc_solar_06.jpg
  • atc_solar_08.jpg
  • atc_solar_07.jpg

  • 0

Scott Bailey -- W7SEB
2007 F350 XLT Diesel CC SRW SB 4x4
Cheap tent and a Partner Steel stove. 
Future? Really like the Hiatus, but I'm broke AF, so dreaming about a DIY.
SOLD: 2008 ATC Panther:dinette, 5th wheel


#4 ScottBailey

ScottBailey

    Senior Member

  • Members
  • 649 posts
  • LocationMesa, AZ

Posted 26 May 2009 - 12:01 AM

Final proof! The panel can charge plenty on a cloudy Arizona day!

Attached Thumbnails

  • atc_solar_09.jpg

  • 0

Scott Bailey -- W7SEB
2007 F350 XLT Diesel CC SRW SB 4x4
Cheap tent and a Partner Steel stove. 
Future? Really like the Hiatus, but I'm broke AF, so dreaming about a DIY.
SOLD: 2008 ATC Panther:dinette, 5th wheel


#5 jcfly

jcfly

    Senior Member

  • Members
  • 209 posts

Posted 26 May 2009 - 09:47 PM

Nicely done. I like your idea of using heater hose for gasket material.
  • 0
Jim 2009 Chevy 2500 HD / 2004 FWC Hawk

#6 Alaskan Snowbirds

Alaskan Snowbirds

    Senior Member

  • Members
  • 263 posts
  • LocationJuneau, Alaska

Posted 26 May 2009 - 10:30 PM

Scott,

Glad to see you've got it ready to go! I'll be curious to hear reports on how the panel does on keeping up with your power use for extended stays.

From the pics it looks like you have a single battery, true?

Happy Trails!
'birds
  • 0
Duane & Susan 2007 Dodge 2500 4X4 Hemi - 2008 FWC Grandby

#7 dsrtrat

dsrtrat

    Senior Member

  • Members
  • 259 posts

Posted 27 May 2009 - 12:46 AM

Scott,
Just wondering why you didn't run the - to the solar controller as per the wiring diagram with the sunsaver. I am assuming you used the frame or battery - to complete the circuit.
The panel output can run several volts higher than the battery voltage and I was wondering if this would cause the controller to malfunction. I have the same set up with a 65 watt panel and 10 amp sunsaver.
I used 2 wire #10 tray cable to minimize voltage drop and fused the positive lead for a disconnect and to protect the wire in case of a short.
Looks like it works as connected though.
Dsrtrat
  • 0

#8 ScottBailey

ScottBailey

    Senior Member

  • Members
  • 649 posts
  • LocationMesa, AZ

Posted 27 May 2009 - 02:57 AM

AK Snowbirds: just returned from 3 nights out. On a sunny day we hit 100% 3.5 hours after sunrise. On a cloudy AZ day with a few sprinkles, it took 6.5 hours. Note that the sunny day followed a warmer night, so less furnace... On the sunny day, the panel seems to put out enough juice to run a fantastic fan on low without battery drain. I'm pleased thus far.

I barely noticed the panel weight when lifting.

Single 75 amp battery. I suppose I'll add another, if I need it.

Dsrtrat: followed Marty's advice and doubled checked with Northern AZ Wind and Sun. ATC prewired front and rear per my request. They run power only and 14 gauge, tieing negative to the frame. I would have requested a larger gauge, but then again it seems more than adequate for my needs.

I think I need to look at the morningstar diagram again since I forgot to add fuses! My controller is, I think, good for 20 amps...

This may be the most useful mod I've done... Well after bolt thru.

Edited by ScottBailey, 27 May 2009 - 04:45 AM.

  • 0

Scott Bailey -- W7SEB
2007 F350 XLT Diesel CC SRW SB 4x4
Cheap tent and a Partner Steel stove. 
Future? Really like the Hiatus, but I'm broke AF, so dreaming about a DIY.
SOLD: 2008 ATC Panther:dinette, 5th wheel


#9 Alaskan Snowbirds

Alaskan Snowbirds

    Senior Member

  • Members
  • 263 posts
  • LocationJuneau, Alaska

Posted 31 May 2009 - 12:41 AM

AK Snowbirds: ...On a sunny day we hit 100% 3.5 hours after sunrise. On a cloudy AZ day with a few sprinkles, it took 6.5 hours. Note that the sunny day followed a warmer night, so less furnace...I'm pleased thus far...Single 75 amp battery. I suppose I'll add another, if I need it...


Scott,

Sounds like you've got good reason to be pleased. That should let you stay until the propane, water, food, or vacation time gives out:)

It doesn't sound like a second battery is necessary unless you plan on increasing load. 6 1/2 hours to recharge after a cooler night and on a cloudy day seems like it works just fine.

We use a CPAP machine on a 125W inverter at night for sleep apnea and it has about 4 amps draw for 8 hours so a second battery might be good for us, especially since we do most of our camping in the (AZ) winter. Storing the full amount available from the panel will probably keep the CPAP and furnace covered and, on a sunny day, let us crank up the laptop some too.

...I have the same set up with a 65 watt panel and 10 amp sunsaver...


Dsrtrat,

Are you running a single battery too? Does the panel pretty much keep up with your needs?

Thanks!
'birds
  • 0
Duane & Susan 2007 Dodge 2500 4X4 Hemi - 2008 FWC Grandby

#10 dsrtrat

dsrtrat

    Senior Member

  • Members
  • 259 posts

Posted 31 May 2009 - 03:47 PM

AK Snowbirds,
Yes I just have the single Interstate 75 amp hr battery that comes stock with the ATC campers. I have a Kyocera KC-65t panel as it was the lightest per watt my research found. I use a Morningstar SS-10 charge controller.

I use an Engel 45 qt fridge and find that the battery charges and mantains the fridge just fine. I use a little bit of lighting and furnace when needed. One thing I did was to use a small boat vent cover to seal the hole in the roof where the cable exits the roof. The one I used is about 1/1/2 inch long. The cable bends underneath and I filled the cavity with caulk, no leaks. I used regular silicone caulk as I like to be able to remove or replace components in case of damage.
Dsrtrat
  • 0


0 user(s) are reading this topic

0 members, 0 guests, 0 anonymous users