Jump to content


Photo
- - - - -

Water intrusion


  • Please log in to reply
6 replies to this topic

#1 Vic Harder

Vic Harder

    Doctor Electric

  • Site Team
  • 4,976 posts
  • LocationCalgary, Alberta

Posted 31 March 2024 - 12:13 AM

My favorite topic.  Not. 


We're back from 64 days on the road all over the NW & SW.  On the way down the west coast from Vancouver, BC to Montery Bay, California we were in that atmospheric river that was washing down the coast in late January and early February.  It rained, a LOT.


We had water intrusion at the front of the camper.  Luckily we had planned to stop at ATC on this trip, and when we did so Marty and crew promptly went to work on the camper (without being asked to!) and we had much less of an issue for the remainder of our trip, which was also MUCH less rainy, so it was hard to tell if all of the fixes Marty and crew did fixed all the issues. What did they do?


- Ran a "miracle bead" (Marty's term) of silicone along the bottom of the top black trim piece across the front of the camper.  (might not have worked?)

- Took all the camper jacks off and cleaned up underneath them and applied fresh sealant on them.. Marty says water runs down the trim and siding and gets behind the jack mounts, and can travel great distances from there.  We were trying to stop water from getting into my propane compartment, which it appears to have done... that compartment is dry.

- Inspected roof screws, he was happy with what I have done, which is to remove each screw and neoprene washer, clean up the area and generously apply 3m4200 to the screw hole and put the screw/washer back on.  

- Cleaned up the back door and applied silicone to the window seals.  There were stains on the door from water dripping/condensation.  Marty figured that this is where MOST of the humidity was getting into the camper.


Did this solve the water intrusion & Condensation issues? Nope.  A lot, but not all. Condensation seems less, but without the hypervent under the mattress it would be soaked daily.  The hypervent has been brilliant at keeping the mattress dry.


So, what's the issue?


I have the top of the camper popped, and an electric heater running full tilt.  It is -5*C outside, _25*C inside.  One window is slightly cracked.


All of the vinyl and the felt around the base of the soft top has dried, except for at the front of the camper in the cab-over area.  This is where most of the water was noticed before we visited Marty.  And I am not sure where/how the water is getting in.


The truck and camper are out on the street, parked on a slight angle so that the passenger front side is probably the low point.  Water/ice is pooling there.


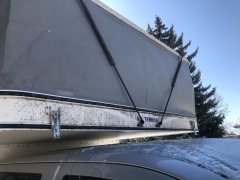
IMG 4323
Front of the camper.... BUGS...  and ice/water
 
Notice the water standing on the lower seal
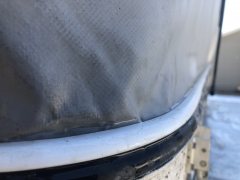
IMG 4321


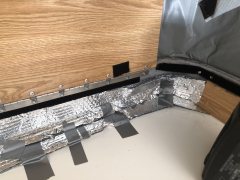
IMG 4325
Water (and ice) pooling in the front pax corner
 
You will notice the Reflectix.  It worked great!  Normally the campers have a long strip of carpet in that space.  It was soaked, and very effectively wicked water from below the hypervent up to where the mattress could touch it.   That carpet is not a good idea, at least for us.
 
In contrast, the Reflectix kept the water away from the mattress, so it stayed dry.  Mission accomplished for a simple field repair.  However, the area behind that reflectix is wet now.  So, not good longer term.
 
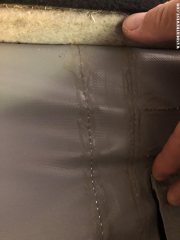
IMG 4331
In this picture (upside down) you can see the needle holes in the vinyl soft top material.  We sealed those seams when we got the camper a few years back, and that has meant that we dont need to use the "Storm Flaps" that ATC still uses on their builds.  That said, the felt directly below this seam is wet now on both sides of the camper.  Have to recheck that sealing job!
 
That said, the vast majority of the moisture seems to be in the front corners and behind the Reflectix.  
 
I have a short video I made that shows off the situation a bit better.  You can see that here (note, you do NOT need to sign up for Dropbox just to view/download the file!).... 

https://www.dropbox....gvsre2r8gm&dl=0


As I say at the end of the video, we could use some help figuring out this puzzle!


  • 0

#2 Taku

Taku

    Buffalo Rockface

  • Members
  • 757 posts

Posted 31 March 2024 - 12:40 AM

newer Cougar (two years old). Sealing the windows is a seemingly never ending battle. I have decided to take the window covers and USE them when in heavier rain to help out with that situation. Did seam seal inside and out, but with all the flexing not sure how long it actually is good for. Replaced the carpet up front with closed cell foam to not have the carpet retain moisture, that works well.  We use a Paco pad so when it does get wet underneath (in winter conditions) it is easy to wipe dry. Might still try the Hypervent. On our old Ocelot I did reseal all the roof screws and around the door and that helped.  Have not heard about the jack brackets so will check those when i have the camper off for plywood painting later this spring.  Good luck!


  • 0

2005 Tundra  2013 Ocelot    "Ridiculously comfortable"


2021 Tundra 2022 Cougar Shell Built Out  "Even more ridiculously comfortable"


#3 pvstoy

pvstoy

    Senior Member

  • Members
  • 2,775 posts
  • LocationCarson City, NV

Posted 31 March 2024 - 02:22 AM

Water getting in onto siding while the top is down?

Maybe has a path ingress around the windows and seams?

The interface between lower siding and base has a path for water?

"- Ran a "miracle bead" (Marty's term) of silicone along the bottom of the top black trim piece across the front of the camper.  (might not have worked?) "   How about a bead on the top where water could trickle in with gravity?


Patrick


  • 0

Patrick

2015 FWC Hawk Flatbed


#4 Vic Harder

Vic Harder

    Doctor Electric

  • Site Team
  • 4,976 posts
  • LocationCalgary, Alberta

Posted 31 March 2024 - 02:43 AM

Thanks for the suggestions.  I may take that black trim out and reseal all the screws, and once it is dry again use a hose to make sure the previous seam sealing job is still working before check out the roof screws (again, the roof/ceiling seems dry) but thinking the water is coming in either via simple condensation (there could have been a pretty thick layer of ice on the area where the carpet normally sits).


  • 1

#5 Jack

Jack

    Senior Member

  • Members
  • 410 posts
  • LocationPortland OR

Posted 31 March 2024 - 03:02 AM

Vic,


I think we forded the same atmospheric river in January and thanks for your suggestions on my post about my leak on that trip.
 

This post offers several more suggestions that I will implement in the last half of April.


Jac


  • 0

2015 Fleet on 2019 Ranger


#6 bajaphile

bajaphile

    Senior Member

  • Members
  • 130 posts
  • LocationNCSD CA

Posted 01 April 2024 - 04:33 AM

I'm not sure this is your issue, but I will just post what I figured out on mine. I pulled the black vinyl trim off, which exposed the screws holding the trim to the camper. I took out the screws and then pulled the trim. It appeared that water was getting in-between the trim and the aluminum siding, and then going into the holes that attach to the aluminum frame.

I applied a strip of butyl tape along the trim and reinstalled it. It appears to have worked, but mine was coming in from the corners and pooling on the side wings. 


  • 0

2001 F350 V10 4x4 w/ 2003 FWC Hawk

1997 Toyota Land Cruiser 


#7 Jack

Jack

    Senior Member

  • Members
  • 410 posts
  • LocationPortland OR

Posted 13 April 2024 - 01:01 AM

I found my leak - probably the same issue as bajaphile.


https://www.wanderth...-leak/?p=290207


Edited by Jack, 13 April 2024 - 01:01 AM.

  • 0

2015 Fleet on 2019 Ranger


0 user(s) are reading this topic

0 members, 0 guests, 0 anonymous users