Jump to content


Photo
- - - - -

Total pop-up fabric replacement; Options?


  • Please log in to reply
16 replies to this topic

#1 trasko

trasko

    Advanced Member

  • Members
  • PipPipPip
  • 54 posts
  • LocationSouth Carolina

Posted 23 February 2011 - 10:56 PM

Well it's time to fix up the old Grandby I picked up a couple of months ago. I had decided to try and sell it but kept the idea to fix it up in my head in case it didn't. Well, it didn't sell for what I wanted so now it's time to tear in to it!

Posted Image

It's rained the past 3 days and the old fiberglass insulation and the headliner were soaked pretty much everywhere. I decided to rip it all out and install rigid insulation like I've seen a few folks here do. Check out the condensation / regular ole moisture-from-leaks here:

Posted Image

So this is where I'm at now:

Posted Image

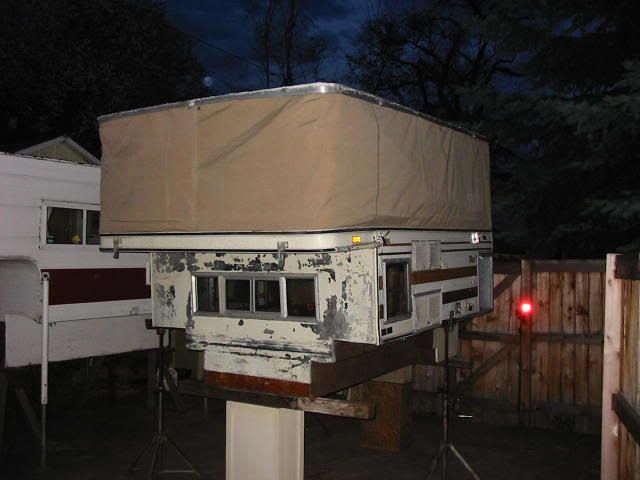
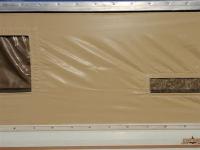
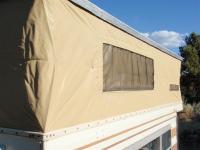
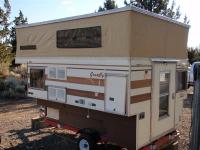
So to get to my real question. At some point I need to do something about the pop-up fabric. It's moldy in some areas. It's got small holes in others. The clear window is so shrunken it barely can touch the velcro. All in all it's not in very good shape. I can't say I'm too surprised since it's 26 years old and there aren't a lot of signs of careful upkeep.

Here's an example of what I mean (yes the shiny wood is from water intrusion):

Posted Image

And the other side:

Posted Image


So... my question is. Right now I see one option: Spend $995 plus shipping to buy the pop-up fabric new from FWC. This seems reasonable, but I have 2 reservations:

1) how difficult is it going to be to install myself; and
2) if I'm going to be making a lot of effort to install it, should I do more work and try and make the pop-up fabric myself from purchased material?

I'm pretty ambitious but I do have lots of other things to be doing. I also have zero experience sewing. :D It seems beyond a patch job to me. Are there any other options out there for me?
  • 0

#2 Phird05

Phird05

    Senior Member

  • Members
  • 274 posts
  • LocationCrested Butte, CO

Posted 23 February 2011 - 11:14 PM

IMHO I would let the pro's do it. They'll get it done right. I know how valuable my time is, and I wouldn't want to take on that task....especially if I had no sewing experience. I'm sure you have addressed this but make sure you solve the leak issues in the roof before doing the upgrade!
  • 0
2008 F-150 5.4L QC 4x4, ride rite air bags, 2009 Hallmark Milner LX

#3 trasko

trasko

    Advanced Member

  • Members
  • PipPipPip
  • 54 posts
  • LocationSouth Carolina

Posted 23 February 2011 - 11:46 PM

I'll be sure to have the roof squared away before updating the fabric. I can be bone-headed but I did think of that one. The roof needs some special attention for sure.

Has anyone ever filled in all the screw holes in the roof and attached it some other way? The new roofs are smooth and use an adhesive, right? Has anyone ever tried using adhesive on the older two-piece roof?
  • 0

#4 pods8

pods8

    Senior Member

  • Members
  • 2,557 posts
  • LocationThornton, CO

Posted 24 February 2011 - 01:34 AM

Has anyone ever filled in all the screw holes in the roof and attached it some other way? The new roofs are smooth and use an adhesive, right? Has anyone ever tried using adhesive on the older two-piece roof?


Some folks have backed each screw out a tad, shot good caulk under it and then retightened. By good caulk we're talking 3M 5200. I've also read some folks have used truck bedliner over the top of their roofs, screws and all.
  • 0

2022 F350 7.3L; family trailer at the moment and some aluminum stuck together to eventually form another truck camper


#5 ski3pin

ski3pin

    Belay On

  • Site Team
  • 15,344 posts
  • LocationSierra Nevada Range

Posted 24 February 2011 - 01:45 AM

We had the guys at All Terrain Campers replace the side liner material, replace a lift panel, repair the other, reseal the roof, and a couple of other minor items. They did a great job at a very reasonable price, and it was done in a short time. We would highly recommend these guys. It was good to have it done right and we've been happily using the camper ever since.
  • 0

2003 Ford Ranger FX4 Level II 2013 ATC Bobcat SE "And in the end, it's not the years in your life that count. It's the life in your years."- Abraham Lincoln  http://ski3pin.blogspot.com/


#6 riz

riz

    Senior Member

  • Members
  • 108 posts
  • LocationFort Collins, CO

Posted 24 February 2011 - 03:41 AM

I sewed and installed this canvas myself. I made it extra tall so I could stand up straight inside (I'm 6'4'). I didn't have the skills to add windows, but it worked out ok without. It's made of heavy cotton canvas and treated with Thompson's Water Seal. Didn't leak when I used it... The guy who bought this camper is living in it right now. The installation is quite easy. It took a few hours. The canvas is sandwiched between the shell and the trim and is attached with ten thousand screws :blink: . I sealed the seams with caulk. If you're not a great seamstress, you might save some $$ by buying the canvas premade, and installing it yourself.
Posted Image
  • 0
It only takes an instant to make a footprint in the sand... It sometimes takes a lifetime to find the beach.

#7 trasko

trasko

    Advanced Member

  • Members
  • PipPipPip
  • 54 posts
  • LocationSouth Carolina

Posted 24 February 2011 - 04:57 AM

I sewed and installed this canvas myself.


Hey, that is impressive. Good work. I do feel like the windows are necessary, though. I guess it's looking like I'm buying the stuff from FWC unless anyone else has a recommendation.
  • 0

#8 Ted

Ted

    Magellan

  • Site Team
  • 2,781 posts
  • LocationEast of Sacramento

Posted 24 February 2011 - 05:06 AM

Get a quote from All Terrain Campers for before making that purchase. Everyone else that has compared them vs FWC for the canvas has gone with ATC.
  • 0

"Not all who wander are lost. Except Ted, he's usually lost."  Dirty Dog


#9 BLM

BLM

    Senior Member

  • Members
  • 161 posts
  • LocationBend, Oregon

Posted 24 February 2011 - 07:24 AM

The old canvas might still be usable. I had a 1983 that initially had some black mold.

Since you have nothing to lose and the canvas sides will probably end up in the dumpster, I suggest first try removing the thin nylon inner liner and foam padding.

A new razor worked great around the windows and vertical seams. Removing the upper aluminum trim made it much easier to separate the nylon liner and outer canvas (or vinyl?).

Removing a few screws at a time and working along the top helps to avoid having the whole canvas come loose at once. It's also a good time to reseal under the trim.

After the inside liner is removed, you might find the inside of canvas is relatively clean. There are 2 or 3 RV cleaning products (Camco) which only costs about $5 each at Walmart. It cleans and removes the mold amazingly well, much better than I expected. The exact same product sells for about $15 at the local RV stores.

It took several hours of scrubbing, but it did take most of the black mold and many years of road grim completely off.

For the project, all external screws were replaced with stainless #8 and #10 hex heads ($20 per 100) from Fastenal. I also used their rubber and stainless washers along with a good sealer (Sikaflex 220) under each screw for the roof.

normal_P8180343.jpg

P8180342.jpg

P8180340.jpg

More random photos of the 1983 project: http://www.syncspeedy.com/gallery2/

I have some "before" pics if you are interested.

Enjoy your project.
  • 0

#10 trasko

trasko

    Advanced Member

  • Members
  • PipPipPip
  • 54 posts
  • LocationSouth Carolina

Posted 24 February 2011 - 07:03 PM

The old canvas might still be usable. I had 1983 that initially had some black mold.
<snip>
I have some "before" pics if you are interested.


Thanks for suggestion. I'm going to think about that for a few days. I am thinking this fabric is totally shot given how it cracks and crunches from brittleness when I close the top down, though.

I looked through all your pictures. I like seeing similar vintage Grandbys. It's inspiring to see other folks doing what I am planning on doing. I'd love to see the "before" pics if it's not too much trouble.
  • 0


0 user(s) are reading this topic

0 members, 0 guests, 0 anonymous users