Is this the crank up jack I need

image.jpgimage.jpg

Your iPad does a lot better job than mine!
Here are a couple of poor iPad pics of the capped top and bottom of the lifter.
 
It's stormy outside (purported 33 foot seas at the beach), so I am not wandering far today. I spent a bit of time in the shop making plates for the roof hand crank. I still need a bit of router work, a little sanding, and a coat or seven of spar varnish or Cetol. The smaller plates will screw into the roof lifting panels, the larger will be a free floating base for the crank.

11893530816_2cdedde9de.jpg
 
You guys do very nice work. Those look great and would make the process even faster I'm sure.

FYI for anybody who's considering the crank-up, you don't necessarily "need" anything to hold it in place, although that's certainly a nice feature. When you imagine it (if you're like me), you probably think the thing just wants to slip out of place ASAP when the roof is at an angle, which would of course screw up your ceiling and roof. It's actually more stable than that.

I've only used the crank a handful of times (I keep it in the camper in case it snows a lot or my wife needs to raise/lower) but I'm comfortable just keeping a hand at the top of the lifter to make sure it doesn't poke a hole in the ceiling. But if you have the skills/equipment to make plates I'm sure you'll be even more confident. I ended up making a 5x5 board with a 1/4 inch lip on one end to put between the lifter and the lifting board - just to spread the load a little.

Also, if you have a shell (or if you buy a short lifter), you might find these lifters to be too short. You can fix that by putting a few short pieces of 2x4, or a block of some sort, sturdy stepstool, or whatever underneath the lifter.
 
I'm a little confused about the lift height, if you go to this link http://www.guitarcen...418-i1170318.gc it says in the specs that the lift height is 31" to 61", am I missing something, this does not sound like it would be of any use. Also the lift rating is 80#, I wonder what the lift load is in pounds for each half of the roof with nothing on it. It seems to me that you could load the yakima racks with 100 or 150#s pretty easily. It sounds like this devise could fail during use. I wonder if the one offered by FWC has a higher lift rating ?
 
This is from Terry at FWC about their hand crank, "The hand crank lift assist measures 46” closed and 72 ½ “ open. It weighs aprox 4# and is rated for lifting 80#."
 
I've been using my speaker stand for over a year and it still works great. I removed the hand crank and use a small power drill so the roof goes up real fast. If you ever visit the FWC factory go see Terry, he has some plates predrilled so you can mount them on the cross beams to keep your stand from slipping. They look like they were originally put there by the Mfg.
 
My Grandby came without struts, and I thought I would add them until I saw this thread. Instead, I bought the speaker stand off Amazon for $77 and free shipping: [http://www.amazon.com/gp/product/B000CD3QYW/ref=oh_details_o00_s01_i00?ie=UTF8&psc=1] and also this speaker mount bracket accessory with it for another $5.95: [http://www.amazon.com/gp/product/B0007SL856/ref=oh_details_o00_s00_i00?ie=UTF8&psc=1].

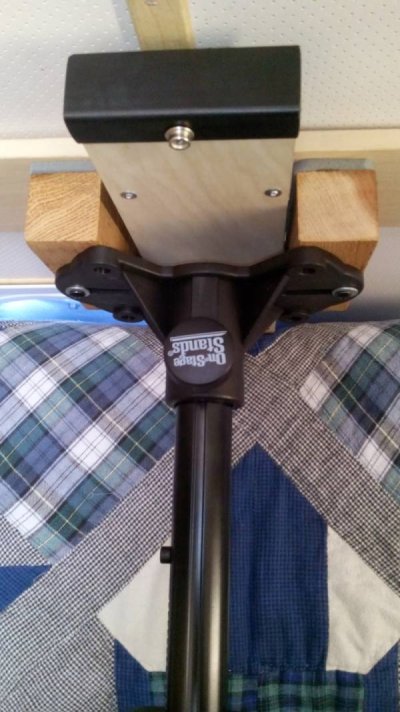
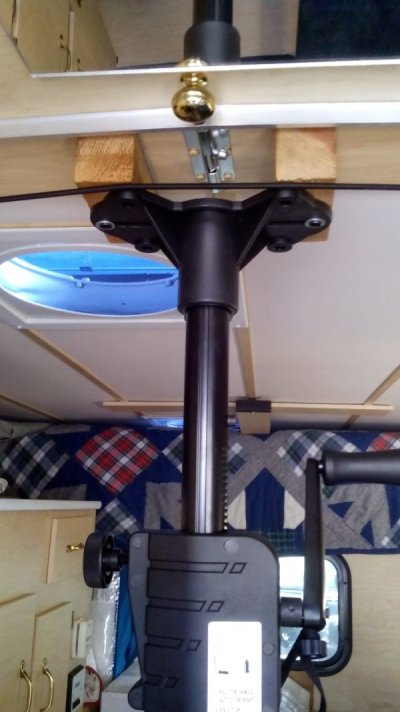
The tripod on it was mounted with nuts and bolts, so was easily removed without drilling out any rivets, so maybe they have changed the design from what I saw mentioned early in this thread? I put one of the rubber pads from the tripod legs over the bottom tube, as mentioned, and mounted the bracket on top. Then I cut a couple of small hardwood blocks from some 1-1/2" stock I had laying around, and glued a piece of 1/4" high-density foam rubber to the top of each one, then mounted them onto the top of the bracket with wood screws. This makes a nice U-shaped yoke to span the center latch in back and the tilt-panel lifting handle in front, and also spreads the load to two points on the roof-lift board, while keeping it centered. (You have to guide the push-handle board out through the yoke as as it slides through it while the top goes up, just to make sure it doesn't catch on the button on the bottom that secures the board to the roof with the nylon strap.)

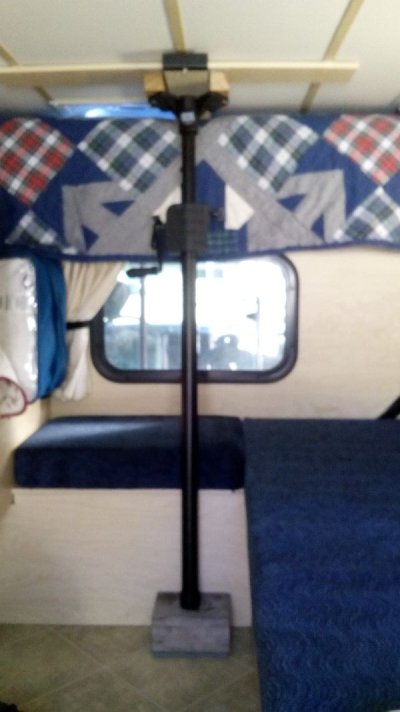
Even with the top bracket extending it 2" or so, the jack is still a little short, so I use a 4x6" block of wood under it (6x6" might be better, as I still go right to the "Maximum" lift mark and a little beyond), with some of the same foam rubber glued to the bottom of it to prevent slipping. Despite the slight angles involved in cranking the roof up, the rubber provides sufficient friction that nothing has ever slipped yet. Going up and down is easy, even for my wife, and fairly quick just using the hand crank, without any drill attachment, IMHO, but it is nice to be able to attach a cordless drill if it's not fast enough for you without it. I find the hand cranking pace just fine myself. I don't have any roof racks or solar yet, so no load on the roof to be able to speak to the weight capacity of the stand, but it seems very adequate. Here's some pics of my setup.
 

Attachments

  • jack1.jpg
    jack1.jpg
    75.4 KB · Views: 322
  • jack3.jpg
    jack3.jpg
    66.3 KB · Views: 330
  • jack2.jpg
    jack2.jpg
    74.1 KB · Views: 313
Here's a photo of the plate I got from Terry @FWC. I just put the tripod feet on both ends.
Scoobydoobydoowhereareyou.jpg
 
And you can get the clips here:
----------------------------------------------------------------------
Sales Order
----------------------------------------------------------------------
Duckworks - PO Box 10 - Harper, TX 78631
Fax: 8308644197

http://www.duckworksbbs.com/hardware/misc/sd491341-53/


ORDERED ITEMS:
SD-491353 - 1-1/2 inch Rubber Pole Storage Clips
Qty: 2 at $1.89 ................................................ $3.78


CHARGES:
Total: $3.78
Choose Correct Region for Shipping/Handling: USA $5.50
Sales Tax: $0.00
Grand Total: ................................................... $9.28


We appreciate your business. If you have any questions or want to make changes, please reply to this email: duckbbs@gmail.com
 
Bob, nice video and info. What is the retracted length of your speaker crank? Mine is too long for the front lift. Also, where did you get the rubber foot for the bottom?

Thanks again!
 
I'll try to remember to measure later but you can estimate based on the end of the video. The rubber feet came from my tripod
 
I saw the speaker that was posted on line. it's recommended weight carrying capacity was only 80 pounds. My fourwheel camper dealer said it should lift 150 pounds....any problems you guys had with the smaller one?
 
The manufacturer rated capacity of the On-Stage Speaker stand that I use is 80 lbs. I have never had a problem with it but I read somewhere another person had the gear teeth grind off metal due to weight and the crank up mechanism had to be repaired or replaced as I recall.

The jack is only lifting a portion of the whole roof at a time and I would be surprised if the weight at the lift point of the roof of my Keystone model were much over 80 pounds (but perhaps on that order).

Here is a link to the model I use:

http://www.guitarcenter.com/On-Stage-Stands/SS8800B-Power-Crank-Up-Speaker-Stand.gc
 
Mine just arrived on Friday. It is model # SS8800B+ and the specs say it is rated to 100lb and the height is listed at 47"-80".
I ordered mine through Amazon.ca from Axe Music in Alberta for $118.95CDN + free shipping. I am very impressed with the supplier, it arrived in 2 days and came with a bunch of free gifts (candy, stickers, T shirt, etc). The tripod is easily removable with a wrench and philips screwdriver (no rivets to drill out).
I have tried the lift with my Makita screw gun & 1/4" nut driver - it sure worked well on the unloaded camper roof. I have even found a use for one of the tripod legs; I intend to install a rubber foot on both ends of the leg and use it as a removable spreader bar for the top of my new 6' folding step ladder, so I can lean the ladder against the side of the camper when loading kayaks.
 
On my Eagle, I was concerned about the strength of the wood cross pieces. So I got some aluminum stock, about 1/8 thick and cut to the size of the wood cross pieces. They were placed behind the wood so they are invisible and add a lot of strength to the process.

I also use wood blocks in the rear to raise the speaker stand up high enough to lift the top.

Cheers
 
Back
Top Bottom