Jump to content


Photo
- - - - -

This old Granby build


  • Please log in to reply
89 replies to this topic

#61 ski3pin

ski3pin

    Belay On

  • Site Team
  • 15,338 posts
  • LocationSierra Nevada Range

Posted 23 September 2015 - 02:19 PM

<snip>My problem was a limited amount of space and living on a hill side didn't help, but it seemed like it consumed every free minute for over a year and i was so happy to get it on the truck.Now it just won't fit in my garage so everything from now on will be done outside..I was in your same position,my wife said"what a ya want that piece of junk back for"? Then I found this form and it's all history...My one piece of advice if you start this ordeal is make sure it is sitting level when you start!!!


Ah, the essences of projects. Well said.  :) 


  • 0

2003 Ford Ranger FX4 Level II 2013 ATC Bobcat SE "And in the end, it's not the years in your life that count. It's the life in your years."- Abraham Lincoln  http://ski3pin.blogspot.com/


#62 Living The Dream

Living The Dream

    Senior Member

  • Members
  • 464 posts
  • LocationFront Range, Colorado

Posted 28 September 2015 - 12:59 AM

Hi All,


1st post on WTW.  Been looking around for a while and just picked up an old fleet for my Tacoma.


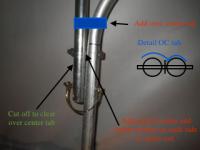
WV.  I love the conduit lifting panel design.  The previous owner of mine completely took out my front panel and was just using a 2X4.  

I am hoping to completely copy your design.


Any suggestions about the build, improvements you would make?


You mention you wish the load was spread out more, two things:

Why didn't you make it generally wider?  So that it was the width of the entire roof.  

And for more attachment points (at least for the top) I was thinking something like this.


http://www.newegg.co...cB&gclsrc=aw.ds


Not sure if it is going to work, I need to get into the roof to see what I can attach too.


For your lower attachments.  Any comment about that?  From the few pictures I see of it, it look like maybe it sticks out a bit into the mattress.  Is that the case or is it all good? Do you have  a part number for those brackets you use?  How did you connect the conduit to the bracket?  


How do you connect all the brackets to the camper frame?


Also, in looking through the enlarged photos on the photobucket link, I think I see one where you put some type of handle on the front with a locking mechanism to fix the problem of climbing on the bed to raise the roof.  Can you give any more spesifics of that?


http://s49.photobuck...smszfj.jpg.html


Any more specifics, comments, and photos you can offer on your lifting system are a huge help.  I am going to pass on the gas strut helpers for now just to save money and get the camper in action as quickly as possible.


I can't believe more people haven't gone after this before.  For someone like us with a few hundred dollar camper, its nearly impossible to justify the 500 panels.  


Thanks for all and any help.


Tim


  • 1

My youtube channel about my Four Wheel Camper - https://www.youtube.com/c/timmorrissey

All about my camper - https://www.tgmorrissey.com/camper

Item I used in my build- http://bit.ly/TGMorrisseyParts


#63 wvtradbow

wvtradbow

    Advanced Member

  • Members
  • PipPipPip
  • 80 posts

Posted 28 September 2015 - 05:32 PM

I'll try to post a few more pics later..This was supposed to be trial an error but it worked the first time and didn't want to mess around anymore. The hardest part especially since I did it by myself was to try to hold everything at the right height while drilling the conduit.I started with one piece of condiut attached with (i guess) 3" L brackets using 2 facing away from each other and those are bolted to the camper frame with the conduit between them..I couldn't come up with anything cleaner as brackets,then with the roof up as high as it will go being held by a 2x4 I put the other condiut piece up against the roof with just regular conduit type clamps and drilled a 1/4 hole through the pivot points..I'll post more pics its easier than trying to explain it...I just guessed at the width,the roof is really not that heavy compared to other campers..the back works fantastic cause you can stand right there but the front is harder to reach (unless you're a knuckle dragger)LOL and has to have a handle,if you look at one of the photos the conduit has pipe rings I was going to mount the handle to but decided against it and just riveted small brackets and put the handle through them,it still pivots fine.It really does go up and down very easily and lays the way it's supposed to..  


  • 0

#64 wvtradbow

wvtradbow

    Advanced Member

  • Members
  • PipPipPip
  • 80 posts

Posted 28 September 2015 - 05:40 PM

Awe almost forgot.My problem was I had the canvas off and the panels off at the same time and had no guidelines when I put the roof up and that's where a lot of my problems came from.It would've been much easier if I could've done it with the roof down in place but couldn't be done that way..If you go this route DON'T TAKE EVERYTHING OFF AT ONE TIME..Do one side at a time so it goes up and down where it needs to be... 


  • 0

#65 wvtradbow

wvtradbow

    Advanced Member

  • Members
  • PipPipPip
  • 80 posts

Posted 29 September 2015 - 12:11 AM

Here's a couple other pictures of the lift bars pin_zpsapjqvggc.jpgback%20bars_zpsi7eejso6.jpg


bracket_zpsfpsmszfj.jpg


Edited by wvtradbow, 29 September 2015 - 12:21 AM.

  • 0

#66 wvtradbow

wvtradbow

    Advanced Member

  • Members
  • PipPipPip
  • 80 posts

Posted 29 September 2015 - 12:19 AM

The picture with the handle is over the bunk, the handle is just held up to the ceiling with the original snap strap,nothing fancy,I don't think I would want to depend on that strap to keep it from falling down but it works good enough to get up there to put the pin in,remember the old panels would kinda snap back toward the vinyl and the handle would hold it in place,these don't "snap" in place because they can bend all the way backwards if the vinyl wasn't there,the original hinges wouldn't allow the panels to bend backwards..One other thing is,I put that other roof vent in above the bed(the only place it would fit) and it kinda interferes with the handle a little,not bad but that created some adjustment with the lift bars as not to hit the knob for the vent when lowering the roof.The lift struts are really worth the extra $100 with these lift bars ,especially in the front with the leverage being bad.


Edited by wvtradbow, 29 September 2015 - 12:28 AM.

  • 0

#67 Casa Escarlata Robles Too

Casa Escarlata Robles Too

    C'est la vie

  • Site Team
  • 9,295 posts
  • Locationmonterey bay area

Posted 29 September 2015 - 12:20 AM

Nice job of restoring the "old "Granby.

Looks good.I like the lift bars you made.

Have fun camping.

Frank


  • 0

2002 Tundra AC TRD 4WD Limited 2009 ATC Bobcat loaded http://sharychic.blogspot.com/


#68 Living The Dream

Living The Dream

    Senior Member

  • Members
  • 464 posts
  • LocationFront Range, Colorado

Posted 29 September 2015 - 12:55 AM

Thanks so much for your comments on this.  It is really appreciated.


Yes I can see what you are saying about not snapping because can go too far into the canvas.  That is a really good point.  I will try to think of something to make them stop at vertical.


Another question if you don't mind.  What are the red cords or wires in the photo.  Are those bungees to the canvas to pull it when lowering the roof.


Ill keep the struts in mind. Im young still and can handle it for a while, but definitely an upgrade that will be on the list.


Thanks again.  Ill get to it in the next few weeks and post pictures.


  • 0

My youtube channel about my Four Wheel Camper - https://www.youtube.com/c/timmorrissey

All about my camper - https://www.tgmorrissey.com/camper

Item I used in my build- http://bit.ly/TGMorrisseyParts


#69 billharr

billharr

    Senior Member

  • Members
  • 2,824 posts
  • LocationStockton CA

Posted 29 September 2015 - 01:32 AM

You could make the conduits go over center. I would put spacers in your pivot bolts to prevent wear. Cut the top conduit just past the pivot bolt, this will allow a over center tab to clear when you put top down. I would weld the tab but could be done with rivets of bolted. Adjust over center tab for how far you want the lift tube to go over center. Edit I would put a rubber end over the end of the upper conduit to prevent wear on canvas. Could use a chair leg protector.

Attached Thumbnails

  • conduit a.jpg

Edited by billharr, 29 September 2015 - 01:37 AM.

  • 1

#70 wvtradbow

wvtradbow

    Advanced Member

  • Members
  • PipPipPip
  • 80 posts

Posted 29 September 2015 - 12:18 PM

Thanks Bill,I actually did put a metal washer between the pipes but never really thought of the end caps,that would clean it up a lot as far as the tab goes,I was wanting them to bend back a little ,i guess hyperextended like the original panels(at least my old ones were) not that they have to be,i guess,now that i used it a couple times a tab just so they don't go past center would be probably be fine..The cords are bungee cords to pull the vinyl in with the bars when lowering it,I still have to "clean those up also" I still have some work to do,I'm not sure this will ever be completely done,I would like to redo the  vinyl this winter,I can do that also for less than $100 and I'll probably get somecrazy color like gold or orange..That was the biggest learning curve.I never did tuck it under the thin roof alum. like they do now and I would leave it about 12"longer so I can pull it tight.But that will be another post... 


  • 0


0 user(s) are reading this topic

0 members, 0 guests, 0 anonymous users