Hello Shellback
Wow that looks awesome, great job sir. I'd like to ask what is the small raised black panel below the fridge?
Russ


1979 Granby
Started by
shellback
, Feb 05 2017 01:41 AM
112 replies to this topic
#91

CougarCouple
-

- Members
- 1,376 posts
Senior Member
- LocationLas Vegas
Posted 08 October 2017 - 03:33 AM
F250 extended cab, Cougar from ATC. You guys rock thank you!
#92
shellback
-
- Members
- 336 posts
Senior Member
- LocationWagontown,PA
Posted 08 October 2017 - 10:52 AM
Hello Shellback
Wow that looks awesome, great job sir. I'd like to ask what is the small raised black panel below the fridge?
Russ
That's the A/C D/C converter. 110 volts in, 3 breakers for 110 volts in the camper, battery charger maintainer, and about 10 fused D/C circuits.
#93
MattC
-

- Members
-

- 70 posts
Advanced Member
Posted 08 October 2017 - 02:30 PM
Just went through this whole thread, and I have to say you do some good looking work, and its turning out great.
#94
CougarCouple
-
- Members
- 1,376 posts
Senior Member
- LocationLas Vegas
Posted 08 October 2017 - 06:30 PM
Got it
Thanks
Thanks
F250 extended cab, Cougar from ATC. You guys rock thank you!
#95
GoinBoardin
-

- Members
-
- 19 posts
Member
- LocationWY
Posted 08 October 2017 - 09:59 PM
That is looking really, really good!
What did you use for trim around the window openings? Mine are unfinished at the moment, and I like what you've done.
#96
shellback
-
- Members
- 336 posts
Senior Member
- LocationWagontown,PA
Posted 08 October 2017 - 11:34 PM
That is looking really, really good!
What did you use for trim around the window openings? Mine are unfinished at the moment, and I like what you've done.
I used leftover material form the siding and sheared it to size and the used a brake to bend it at a 90. Fortunately my son has all the equipment at the shop he works at. I miter cut the corners and then just screwed it to the framing around the window.
#97
Living The Dream
-

- Members
- 464 posts
Senior Member
- LocationFront Range, Colorado
Posted 09 October 2017 - 03:03 AM
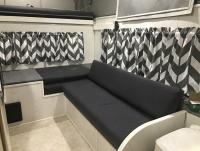
Got some more done. Covered all the plywood seat tops and backs with carpet and also upholstered my cushions. On the right is a couch that the bottom pulls out and the back drops down to form a bed 74"s by 28"s. That will be for my wife. The cabover bed is 78"s by 44"s, that for me. Now either of us can get up to pee without bothering the other
. Winter projects will be to make natural finish wood cabinet doors and drawers. Also a small cabinet forward and aft on the passenger side wing. Forward on the left is the converter, water tank and pump, and also the battery. At present there is a A/C D/C compressor fridge, but no built in propane. I was going to wait on roof lift struts, but I'd like to get them on before the 22nd and our first trip.
Shellback it looks great! The molding around the walls and everything looks professionally done!. The counter top too! Really nice job! Looks like the canvas came out okay in the end as well! Looking forward to seeing it in action. - Tim
Edited by Living The Dream, 09 October 2017 - 03:03 AM.
My youtube channel about my Four Wheel Camper - https://www.youtube.com/c/timmorrissey
All about my camper - https://www.tgmorrissey.com/camper
Item I used in my build- http://bit.ly/TGMorrisseyParts
#98
shellback
-
- Members
- 336 posts
Senior Member
- LocationWagontown,PA
Posted 09 October 2017 - 11:51 AM
Shellback it looks great! The molding around the walls and everything looks professionally done!. The counter top too! Really nice job! Looks like the canvas came out okay in the end as well! Looking forward to seeing it in action. - Tim
Thanks! I enjoyed your video too!
#99
shellback
-
- Members
- 336 posts
Senior Member
- LocationWagontown,PA
Posted 12 October 2017 - 12:43 PM
Almost read to go! Lift struts arriving tomorrow I hope. I was at the point of just taping paper over the windows for privacy on our upcoming trip. Stopped by Wallyworld and saw some curtains that might look good. They were 27"x84". Bought 2 pair and cut the top off for the right length for my side window. Then I hemmed the bottom. Then I cut the remaining portion with the bottom hem to fit my front window. Then I hemmed it for the curtain rod. Still had enough material left to do the one small window drivers side front, and also the door window. The wife likes them! Maybe just the cabinet doors and drawers left to do this winter. I placed my A/C D/C fridge where the original ice box was. Drivers side, just behind the window. Reading other posts about the efficiency of the top loader fridges, I'm considering buying one for next year and placing it up forward. It's kind of dead space for me now, with the battery, water tank and electrics under it. That would also free up the fridge space for use as a pantry area.
Our first trip starts the 22nd, for 10 days in VA. It's at a Army Corps campground with bathhouses, water and electric. No roughing it this first trip. We like to go this time each year, they close Oct 31st, so probably only 20% of the sites are occupied.
Attached Thumbnails
#100
Living The Dream
-
- Members
- 464 posts
Senior Member
- LocationFront Range, Colorado
Posted 12 October 2017 - 02:40 PM
Almost read to go! Lift struts arriving tomorrow I hope. I was at the point of just taping paper over the windows for privacy on our upcoming trip. Stopped by Wallyworld and saw some curtains that might look good. They were 27"x84". Bought 2 pair and cut the top off for the right length for my side window. Then I hemmed the bottom. Then I cut the remaining portion with the bottom hem to fit my front window. Then I hemmed it for the curtain rod. Still had enough material left to do the one small window drivers side front, and also the door window. The wife likes them! Maybe just the cabinet doors and drawers left to do this winter. I placed my A/C D/C fridge where the original ice box was. Drivers side, just behind the window. Reading other posts about the efficiency of the top loader fridges, I'm considering buying one for next year and placing it up forward. It's kind of dead space for me now, with the battery, water tank and electrics under it. That would also free up the fridge space for use as a pantry area.
Our first trip starts the 22nd, for 10 days in VA. It's at a Army Corps campground with bathhouses, water and electric. No roughing it this first trip. We like to go this time each year, they close Oct 31st, so probably only 20% of the sites are occupied.
ShellBack. That looks incredible! Very, very, professional. Good call just buying curtains and modifying them, we bought raw fabric, and haven't gotten around to it yet....
Two questions for you.
1. Do you have a source for new curtain rods?
2. What are your trim pieces, the 90 deg pieces I see running around all your lower panel? I want to finish mine off with something like that. Is it plastic, metal, or wood. Again, do you have a source?
Looking forward to seeing the pics of the camper out on the road! Congrats again on tackling the project.
My youtube channel about my Four Wheel Camper - https://www.youtube.com/c/timmorrissey
All about my camper - https://www.tgmorrissey.com/camper
Item I used in my build- http://bit.ly/TGMorrisseyParts


0 user(s) are reading this topic
0 members, 0 guests, 0 anonymous users

