
Haven’t tried it but it appears you could use on of these as a gender-bender with the Renogy MC4 adapter above to switch polarity without cutting. Pick one with 8 or 10 ga wire. After testing polarity, use electrical tape to tape the correct connectors together.
https://www.amazon.c...2 pin connector
Paul

18 replies to this topic
#11

PaulT
-

- Members
- 2,612 posts
Need gumbo
- LocationHillsboro, Oregon
Posted 22 April 2018 - 10:13 PM
I thought getting old would take longer.
#12
rando
-

- Members
- 1,638 posts
Senior Member
- LocationColorado
Posted 23 April 2018 - 03:49 PM
Nice thing about making your own adapter is that you get to chose the polarity - so you can end up the 'right way around'.
The SAE connector (like the Anderson Power Pole) just needs to go away as they are terrible connectors. But as long as manufacturers keep installing them, they will continue to be the standard.
2016 Fleet Flatbed
2016 Toyota Tacoma
#13
BillTheHiker
-
- Members
- 307 posts
Senior Member
- LocationBoise, ID
Posted 28 April 2018 - 08:52 PM
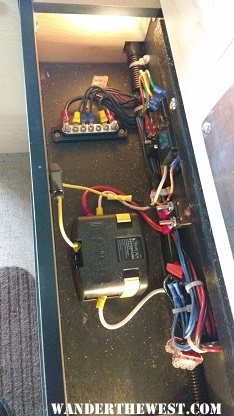
Finally got all the components I need but have a question. The solar wires that are labeled rear, roof and battery are terminated in two clear plastic boxes. What are those plastic boxes, should they be removed and how?
#14
So Cal Adventurer
-

- Members
- 368 posts
Senior Member
Posted 28 April 2018 - 09:56 PM
Finally got all the components I need but have a question. The solar wires that are labeled rear, roof and battery are terminated in two clear plastic boxes. What are those plastic boxes, should they be removed and how?
Check the polarity. If you’re not using Zamp, they are probably backwards
Follow My Shenanigans: instagram.com/campermccampface
#15
BillTheHiker
-
- Members
- 307 posts
Senior Member
- LocationBoise, ID
Posted 28 April 2018 - 10:16 PM
My question is how to access those wires? the ends are enclosed in clear plastic cases. I am tempted to just smash the plastic or cut them off but figure I should try to find out what they are first. In the photo, if you zoom into the bottom you can see the coils of wire are all terminated in these little plastic boxes.
Edited by BillTheHiker, 28 April 2018 - 10:17 PM.
#16
So Cal Adventurer
-
- Members
- 368 posts
Senior Member
Posted 29 April 2018 - 03:23 AM
My question is how to access those wires? the ends are enclosed in clear plastic cases. I am tempted to just smash the plastic or cut them off but figure I should try to find out what they are first. In the photo, if you zoom into the bottom you can see the coils of wire are all terminated in these little plastic boxes.
Did you look in the actual Battery Bank area? Mine were in there labeled. No plastic casing like you show in that photo
Follow My Shenanigans: instagram.com/campermccampface
#17
pvstoy
-

- Members
- 2,775 posts
Senior Member
- LocationCarson City, NV
Posted 29 April 2018 - 03:41 AM
Those plastic cases can be opened. The ends have a bump out tab on the sides. Take a small flat blade and pry apart each side. Then the clear outer case comes off. That leaves you with a metal tab that holds the wire that is pushed in. With flat blade pry up on the metal tab and pull out the wire. Put it back together with plyers until it snaps. Then you can push in another stripped wire end.
Patrick
2015 FWC Hawk Flatbed
#18
BillTheHiker
-
- Members
- 307 posts
Senior Member
- LocationBoise, ID
Posted 29 April 2018 - 06:06 PM
Did you look in the actual Battery Bank area? Mine were in there labeled. No plastic casing like you show in that photo
The ones in my photo get connected to the solar controller and are labeled battery, roof and rear. I will not be using the rear unless I get a portable solar panel. The wires in the battery box are labeled solar battery and have already wired them up, hot one with a fuse.
#19
BillTheHiker
-
- Members
- 307 posts
Senior Member
- LocationBoise, ID
Posted 30 April 2018 - 08:46 PM
I finally got everything I need to proceed and hopefully finish up this project. Following is what I have done so far -please critique.
I went with the MC4 to SAE adapter, mainly because I have very limited wiring experience, so it was simple. As suggested, I checked the polarity of the wires in the camper and they are reversed. I bought a multimeter, which also have zero experience using, but figured it out. I set the solar panel on the ground, titled to directly face the sun, but the panel is partly shaded due to tree leafs.
I plugged it into the rear solar plug. I took the two wires labeled "rear solar", and using the probes on the multimeter it showed positive 1.30 amps when the black probe touched the red wire and red probe touched the black wire. Reversing the contacts, it showed negative .7 amps. I also tested the battery posts, red to red, which showed positive 12.78 volts and that is exactly the number I get with my new battery charger so it seems the multimeter is pretty accurate and I think I am safe connecting the solar wires in reverse to the Morningstar solar controller.
There are also a red and black wire labeled battery to be connected to the Morningstar controller. Am I correct they should be connected red wire to positive and black to ground,i.e., not reversed? And I think the same goes for the red and black wires in the battery compartment labeled "solar battery" and I have a 30 amp inline fuse for the red(hot) wire.
Edited by BillTheHiker, 30 April 2018 - 08:48 PM.


0 user(s) are reading this topic
0 members, 0 guests, 0 anonymous users

