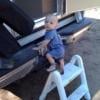
We are usually or own worst critics. It looks real good from here. Did you get any input from Marty and crew?here is the sloppy job i did, but it turned out ok. the top row is the back, and the bottom row is the front.

roof lifting helper shocks thingys
Started by
The Saints
, Mar 04 2010 11:44 PM
418 replies to this topic
#51

ScottBailey
-
- Members
- 649 posts
Senior Member
- LocationMesa, AZ
Posted 22 March 2010 - 06:44 PM
Scott Bailey -- W7SEB
2007 F350 XLT Diesel CC SRW SB 4x4
Cheap tent and a Partner Steel stove.
Future? Really like the Hiatus, but I'm broke AF, so dreaming about a DIY.
SOLD: 2008 ATC Panther:dinette, 5th wheel
#52
The Saints
-
- Members
- 239 posts
Senior Member
- LocationSanta Cruz, CA
Posted 23 March 2010 - 01:29 PM
No, as it ended up, it was so easy I did not feel it worth asking them about it. It worked great on our camp trip, and I feel it a success. I still need to remove the fasteners and seal them, so I am not quite done yet.
Scott, Valerie and Dukino
2002 Tacoma Ext Cab TRD 4 X 4
2020 FourWheel Fleet, loaded
#53
jimmythec
-

- Members
-

- 15 posts
Member
- LocationEastern Washington
Posted 23 March 2010 - 03:22 PM
Thanks for the starting the great thread an the shocks. The info here helped me a lot and It looks like some of the other guy's also. Happy camping!
#54
Alex
-

- Members
- 241 posts
Senior Member
- LocationSF Bay Area
Posted 23 March 2010 - 05:44 PM
Thanks for posting this, great information.
A couple questions.
1) Do we just use metal tap screw to secure the bracket or we drill through and use a nut and bolt?
2) Since we are mounting the gas strut on the outside and exposed to elements, can these struts last in this type of application?
Thanks!!
A couple questions.
1) Do we just use metal tap screw to secure the bracket or we drill through and use a nut and bolt?
2) Since we are mounting the gas strut on the outside and exposed to elements, can these struts last in this type of application?
Thanks!!
#55
dsrtrat
-

- Members
- 259 posts
Senior Member
Posted 23 March 2010 - 08:44 PM
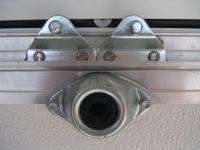
Alex,
I used #10x3/4 inch stainless standard point sheet metal screws. I drilled a 3/32 pilot hole through the track and one side of the frame member. I used a mastic strip under the bracket for a seal. I put an offset bracket on the bottom and a flat bracket on the top for better alignment of the strut.
As for how long they will last I will have to wait and see. Pretty easy and cheap to replace as needed.Also easy to remove if you have to drive in winter conditions. I may take them off when I don't have a load on the top, just have to try it for a while. I figured for less than 100 dollars in parts I don't have much to lose.
Thanks for posting this, great information.
A couple questions.
1) Do we just use metal tap screw to secure the bracket or we drill through and use a nut and bolt?
2) Since we are mounting the gas strut on the outside and exposed to elements, can these struts last in this type of application?
Thanks!!
Attached Thumbnails
#56
Alex
-
- Members
- 241 posts
Senior Member
- LocationSF Bay Area
Posted 23 March 2010 - 09:12 PM
Alex,
I used #10x3/4 inch stainless standard point sheet metal screws. I drilled a 3/32 pilot hole through the track and one side of the frame member. I used a mastic strip under the bracket for a seal. I put an offset bracket on the bottom and a flat bracket on the top for better alignment of the strut.
As for how long they will last I will have to wait and see. Pretty easy and cheap to replace as needed.Also easy to remove if you have to drive in winter conditions. I may take them off when I don't have a load on the top, just have to try it for a while. I figured for less than 100 dollars in parts I don't have much to lose.
Thanks! Your are right, I can take the structs off when not in use.
#57
The Saints
-
- Members
- 239 posts
Senior Member
- LocationSanta Cruz, CA
Posted 24 March 2010 - 01:42 PM
Alex, like dsrtrat I used screws. Mine were self tapping, but I predrilled a cheater pilot hole. Then this weekend I plan on removing them and adding silicone sealant. I know I should have done it when I installed them, but time was an issue and I want to do a complete, good job.
Scott, Valerie and Dukino
2002 Tacoma Ext Cab TRD 4 X 4
2020 FourWheel Fleet, loaded
#58
Alex
-
- Members
- 241 posts
Senior Member
- LocationSF Bay Area
Posted 24 March 2010 - 03:30 PM
Alex, like dsrtrat I used screws. Mine were self tapping, but I predrilled a cheater pilot hole. Then this weekend I plan on removing them and adding silicone sealant. I know I should have done it when I installed them, but time was an issue and I want to do a complete, good job.
Scott,
Thanks for the tip on silicon sealant.
Alex
#59
Dughlas Stiubhart
-
- Members
- 1,474 posts
It's good to be Stew
- LocationSE CO
Posted 24 March 2010 - 04:01 PM
Thanks for the tips, photos and information from all you guys!
Stew
2007 Custom All Terrain Camper Panther Shell on 2012 Toyota Tundra 4x4 in SE CO
#60
dsrtrat
-
- Members
- 259 posts
Senior Member
Posted 24 March 2010 - 07:46 PM
I should have added that on the bottom front brackets I used 3/16 pop rivets rather han screws.I didn't want the screws sticking through into the matress area.Use blind end rivets if you can find them, they are more waterproof.
Dsrtrat
Dsrtrat
Thanks for the tips, photos and information from all you guys!


0 user(s) are reading this topic
0 members, 0 guests, 0 anonymous users

