Paint...start to finish
#1
Posted 08 October 2012 - 11:23 PM
If you use the info here it will save you a ton of time...I thought it through for a couple years and took alot of notes along the way before the big begin
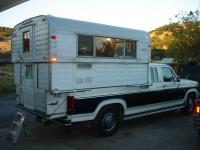
This is what I started with....1970 10' NCO, my grandparents bought it to retire in...they first got an 8'er...came home after a couple weeks and traded it in for the 10. My sister bought it from Granny and I bought it from Sister Anne. It has seen alot of miles and things were pretty well worn when we started...upper paint had all but disappeared from the sun exposure. Vinyl was worn out and a few pieces of the woodwork were "weathered"....
A couple things to notice on this photo...the stairs...a common way of entry...changes dramatically during this process...
the vents on the lower section...also changes...new refer install required new vent configuration..
And....yes, that's "Jake the alligator man" from Long Beach on the lower section rear...sis has a house in Seaview so we venture up that way now and then.
Note the extent of the paint failure...no UV stabilization on the siding paint used at the build time in the late 60's early 70's.
Note the emblems....they take a change too and the little bean shaped patch up front top...brother in law goes to the bank with bikes on the cab of their truck...voila...I left it as a reminder
2003 Ford 250 Superduty Crew.... 7.3L PowerStroke diesel 1970 10" NCO Alaskan Firestone airbags pulling a 18' Silver Streak runabout
#2
Posted 08 October 2012 - 11:45 PM
1. Take off the emblems, bar lights front and back and the clearance lights....if the light bases look good..save them and get new covers..easily found at your local O'briens,Kmart or most auto parts shops.
2. Remove the drip rails, front and back...try and retain these...they're difficult to replace...you've heard of hens teeth...these are hens molars...discard the screws...you'll be replacing all the screws. clean the drip rails and find a good spot on the wall to hang them up...it'll be a while before you get them back on.
3. paint survey....if it's mostly degraded on the top..make up your mind right now to sand all loose and even some adhered paint off...most will go. You'll be needing wet or dry sand paper....auto paint shop will have this material...start with 220 grit on a small rubber block. you may need some 100 grit and 150 grit as well. The rubber will take the water and hold the paper well with the small nail retainers or clips.
4. remove the eyebrows on all windows...if they're in reasonable shape they will do. If they're blasted or smashed they'll go...I used to have a link for replacements...I'm going to have to locate a new one...short ones only are available and one has gone out of business.
That's all for now...I'm going to try and find a new way to size photos..most so far have been too big for attaching....565k...I'll see what I can do about that....In the mean time...go get those pallets...the camper needs to be solidly set in place....no work on the jacks should be attempted.
I'll add a bit every day or so and edit these starters as needed.
2003 Ford 250 Superduty Crew.... 7.3L PowerStroke diesel 1970 10" NCO Alaskan Firestone airbags pulling a 18' Silver Streak runabout
#3
Posted 21 November 2012 - 07:50 PM
Here you can see most of the paint stripped off the upper and some off the lower sections, blue bodywork putty applied and sanded. The upper photo shows the additional screws which split the spacing of the radius to tighten up the hold on the caulking. This was a learning experience. Knowing what I know now...remove the light fixtures to start and save some time and grief.
pictures are now on my gallery where the limited size for posting doesn't apply
Edited by Rusty, 12 April 2017 - 04:00 PM.
2003 Ford 250 Superduty Crew.... 7.3L PowerStroke diesel 1970 10" NCO Alaskan Firestone airbags pulling a 18' Silver Streak runabout
#4
Posted 21 November 2012 - 07:58 PM
These next photos are after the first spot priming was applied and additional putty work was done...the green primer is a two part acid etching primer formulated for aluminum aircraft skin. New eyebrows were primed and installed with new screws and a bit tighter spacing. Sealant behind the eyebrows was a 1/8 inch butyl glazing bead which comes in rolls from your local glass shop.
again...photos are in my gallery
Edited by Rusty, 12 April 2017 - 04:00 PM.
2003 Ford 250 Superduty Crew.... 7.3L PowerStroke diesel 1970 10" NCO Alaskan Firestone airbags pulling a 18' Silver Streak runabout
#5
Posted 21 November 2012 - 08:09 PM
These next shots are of the primer being applied. All the work was done outside with drop cloths over the front of the garage and the ground soaked to prevent dust. It's a rough location to apply paint but this urethane drys so quickly everything came out just fine.
go to gallery for pics
Edited by Rusty, 12 April 2017 - 04:01 PM.
2003 Ford 250 Superduty Crew.... 7.3L PowerStroke diesel 1970 10" NCO Alaskan Firestone airbags pulling a 18' Silver Streak runabout
#6
Posted 21 November 2012 - 08:17 PM
The next shots are of prepping the bottom half for the sanding sealer, priming the bottom with the grey sanding sealer and finally a rest.....this priming job was completed in one day including all the masking....by your truly and I was one tired puppy by the end of the day...hence the very important..resting shot.
it's a shame the pictures are too big for inclusion here anymore but...go to my gallery...
Edited by Rusty, 12 April 2017 - 04:02 PM.
2003 Ford 250 Superduty Crew.... 7.3L PowerStroke diesel 1970 10" NCO Alaskan Firestone airbags pulling a 18' Silver Streak runabout
#7
Posted 21 November 2012 - 08:55 PM
The next shots are of the prep for the final coat on the top half, the finish coat and the masking for the paintng of the bottom half. Note on the masking shots that all of the tape holding up the 9" masking paper is taped to the window masking or the handle and light fixture masking. that's because the top was wet when the masking was applied....no touchy...no messy....very carefully applied
go to my gallery for pics
Edited by Rusty, 22 August 2017 - 05:03 PM.
2003 Ford 250 Superduty Crew.... 7.3L PowerStroke diesel 1970 10" NCO Alaskan Firestone airbags pulling a 18' Silver Streak runabout
#8
Posted 21 November 2012 - 09:02 PM
2003 Ford 250 Superduty Crew.... 7.3L PowerStroke diesel 1970 10" NCO Alaskan Firestone airbags pulling a 18' Silver Streak runabout
#9
Posted 21 November 2012 - 09:09 PM
easy as 1,2,3
2003 Ford 250 Superduty Crew.... 7.3L PowerStroke diesel 1970 10" NCO Alaskan Firestone airbags pulling a 18' Silver Streak runabout
#10
Posted 21 November 2012 - 09:22 PM
and again....without the technical assistance of Steve McGoverny in Modesto at 209-575-4570 this would not have taken place. He owns a body shop supply company and his technical knowledge of aluminum, fillers and paints was and is...(every time I look at the camper)...worth its weight in gold...and I mean every word of it
2003 Ford 250 Superduty Crew.... 7.3L PowerStroke diesel 1970 10" NCO Alaskan Firestone airbags pulling a 18' Silver Streak runabout
0 user(s) are reading this topic
0 members, 0 guests, 0 anonymous users