Jump to content


Photo
- - - - -

Uh oh, its not just maintenance


  • Please log in to reply
38 replies to this topic

#21 Wandering Sagebrush

Wandering Sagebrush

    Free Range Human

  • Site Team
  • 10,594 posts
  • LocationNortheast Oregon

Posted 17 November 2014 - 01:31 AM

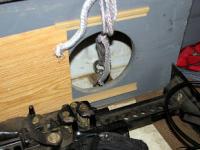
Craig, I would go to a good store like TAP Plastics and pick up some quality epoxy.   It's stronger than the wood, so you will have a good repair, just make sure you get it well into the broken area.  You will need to use something like your bottle jack to push the wood back into place.   A piece of wood or metal to distribute the clamping force.   Put a couple of sheets of wax paper or plastic between the repair and the piece of wood that distributes the load, otherwise, you'll have a new addition to the bottom of that section.


Talk to the people at the store, and ask questions about the right epoxy to use for temperatures in your area, and to learn what additional supplies you'll need.   Measuring cups, mixing cups, etc.   They will probably have a good idea on the best way to get it into  recesses of the break.   


There are also glues that would be effective.   Resorcinol is one that is widely used in boat building.   Perhaps this might be a better choice now that I think about it.   It's widely used in boats, and I suspect not as fussy as epoxy.   There's a rumor that we have a couple of wood workers in the group, so let's see what they say.  


Edited by ski3pin, 17 November 2014 - 02:30 AM.

  • 0

I am haunted by waters


#22 craig333

craig333

    Riley's Human

  • Members
  • 8,023 posts
  • LocationSacramento

Posted 17 November 2014 - 01:44 AM

I like banjos, I just don't just get a little nervous when I hear them while I'm camping :)


As long as I'm done by Tuesday. Rain forecast for Wednesday.


  • 0

Craig K6JGV_________________________ 2004 2500 CTD 4X4 FWC HAWK 1960 CJ5


#23 fish more

fish more

    Senior Member

  • Members
  • 796 posts
  • LocationSierra Foothills

Posted 17 November 2014 - 03:14 AM

Yes I agree with the epoxy fix. Then add your plates, make sure the plates are long enough to distribute the stress to a larger area. I too took my camper off this last week to paint the lower wood structure, put a second coat on sat am. Hope to reinstall tuesday. I checked my hold downs and found no stress or cracks in all four corners. Might also suggest to get some Torklift Derringer Fast Gun tie downs and get rid of the turnbuckles. I added "J" bolts to the Fast Guns, a couple of quick links, a little time to get adjusted to the right tension, no more problems with anything coming loose.


I did however use the same paint FWC uses, instead of flat, I chose eggshell to provide more protection and help seal up the wood. The paint is made by Frazee #8535 Wayfarer Gray. They are located in Sac, also in Roseville. Good luck with your fix !!


  • 0

#24 Beach

Beach

    Senior Member

  • Members
  • 866 posts

Posted 17 November 2014 - 09:55 PM

Definitely go the epoxy route. Unless you apply pressure to the wood in both directions it is not going to be a strong lamination. Have you thought about cutting that broken piece out and scarfing in a new section, shouldn't be too hard, it's all butt joints except the joint were the new plywood joins together(where the scarf would be). I like the idea of the full length angle, beside spreading the load it allows for many options for tie down positions. P.S. I use epoxy often, don't fight the conditions when using it, wait for good weather if you have time.

Edited by Beach, 17 November 2014 - 09:56 PM.

  • 0

#25 craig333

craig333

    Riley's Human

  • Members
  • 8,023 posts
  • LocationSacramento

Posted 18 November 2014 - 01:16 AM

Got it all painted up. I hate painting, especially laying on your back. I have paint in my beard, on my face, clothes, I even got paint on the dog. I'll put it all back together tomorrow. The repair on the broken wood is iffy. As thick as the epoxy was it didn't want to stay there. I wound up covering it with a piece of the thin diamond plate. I think it'll be plenty strong when I'm done. 

IMAG0436_zps54e1775c.jpg

Btw, I used Behr Premium porch paint, a couple shades lighter than the original grey.


Oh yeah, I also took advantage of having it off to clean the window on the camper and the truck. I can see again! Washed the truck too. Got a few spots that haven't seen daylight in years.


  • 0

Craig K6JGV_________________________ 2004 2500 CTD 4X4 FWC HAWK 1960 CJ5


#26 craig333

craig333

    Riley's Human

  • Members
  • 8,023 posts
  • LocationSacramento

Posted 19 November 2014 - 12:31 AM

Finished up today. Instead of a slot like FWC did I just drilled a hole. The original eye bolts are still there just in case. Only hit my finger with the hammer once. 

IMAG0437_zps2ef562bd.jpg

I was more conservative with the other side since its still in good shape. Hope I don't regret doing more there but I was running out of time and money.

IMAG0438_zps5ee27766.jpg

Back together finally. I spent some time getting the camper perfectly centered. Hold downs are hand tight and all have nuts this time.

IMAG0440_zpseab59ea5.jpg

Glad I had some metal on hand and decent amount of tools and bolts. A bandsaw would have been handy.

IMAG0441_zps0d1098b7.jpg

I did forget a couple things. I wanted to install a strap from the bed to the camper, a last resort all tied downs have failed kind of thing. Forgot. I wanted to run another wire parallel to the existing power wire while it was off. Forgot. I'll still do that just would have been easier with the camper off.


Now its cleanup time. Cleaned the driveway and put away most of my tools but the camper needs a thorough cleaning along with the work bench.


Gotta love how a simple two day (one for the paint to dry) maintenance project turns into a four day ordeal. Oh well, I have faith its going to last. Another pair of hands would have been nice. Nothing like being a contortionist. I wish I could have got a couple pics of me holding a wrench on the outside and the inside at the same time. 


I would have done some things differently with more access but I'm even close to doing the major rebuild that would entail. Now I can wait another ten years before the camper comes off again. Maybe less, we'll see how the paint holds out.


  • 0

Craig K6JGV_________________________ 2004 2500 CTD 4X4 FWC HAWK 1960 CJ5


#27 mojave joe

mojave joe

    Advanced Member

  • Members
  • PipPipPip
  • 35 posts
  • LocationPinon Hills, Ca (Hi-Desert)

Posted 20 November 2014 - 07:26 PM

 After rescuing a FWC and repairing the lift panels, the cab over and replacing the headliner and canvas. I gave up.

An aluminum frame that is not tied into the lower section and anchor points is worthless. Sorry folks, a camper advertised for four wheeling should do better..just my .02 cents..


  • 0

#28 SunMan

SunMan

    King Taco

  • Members
  • 2,362 posts
  • LocationOxnard, CA.

Posted 20 November 2014 - 07:43 PM

Craig,
Meant to post this earlier but just so you don't feel alone, this happened to me in Baja back in 2010. I fixed it with some aluminum plates that Stan happily mailed to me when I got back. Rigged it with some rope that got me through the remainder of the trip.

Attached Thumbnails

  • IMG_6063.JPG
  • IMG_6064.JPG
  • IMG_6070.JPG
  • IMG_6072.JPG

  • 0

Sunman
2003 Four Wheel Camper -Hawk

2023 All Terrain Camper - Panther 
2006 Toyota Tundra Double Cab Limited 4WD
2017 Toyota Tundra Double Cab Limited 4WD


#29 craig333

craig333

    Riley's Human

  • Members
  • 8,023 posts
  • LocationSacramento

Posted 21 November 2014 - 12:49 AM

One thing I forgot to mention. The squeak thats been driving me nuts was still there with the camper off. I actually thought it was the camper. Now as soon as it stops raining I'll crawl under the truck and find out what it really is.


  • 0

Craig K6JGV_________________________ 2004 2500 CTD 4X4 FWC HAWK 1960 CJ5


#30 60toyetero

60toyetero

    Member

  • Members
  • PipPip
  • 23 posts

Posted 09 February 2015 - 03:08 PM

Just happened to me.. what a joke.. a company that charges so much for their campers should do a complimentary shipping of upgraded mounting hardware. I wish I would have read more about them before i got one. sold for 4wheel adventures but don't hold up on a slightly bumpy road. I baby my stuff and I was not going fast through the bumps at all and next thing I was hearing was my chain on the bed of the truck. the surface area on those original anchor points is a design flaw. That should have been one of the first things addressed when designing something to hold up on the off road.


Edited by 60toyetero, 09 February 2015 - 03:08 PM.

  • 0


0 user(s) are reading this topic

0 members, 0 guests, 0 anonymous users