
The turnbuckle access holes are inside the dinette seat boxes on the passenger side. It will be a tight place to work around, and I’m hoping works out okay. I’m not planning to take the camper off very often. In honesty, I didn’t have the opportunity to look over a factory built model in person before I did my floor pack in the beginning and cut the access holes, I just went off of pictures from the forum, and I’ve tried to complete the interior build with as much common sense as possible. I think it’s going to be a little difficult to access the turnbuckles, but I think it will work out. For sure there’s a lot of trial and error that has gone into what the factory puts out these days, and I’m sure many kinks have been worked out. Wish me luck on mine.
Storage spaces were made out of what seemed like available useable space, and not sure what will go in them fully as yet. Batteries will go in the lower half of the front seat box, Lagun table mount pieces will go in the narrow storage compartment along the side of the dinette when the bottom bunk is in use.

 1 vote(s)
Full build - Reconstructing a 1981 Grandby into a custom Hawk!
Started by
PokyBro
, Apr 11 2016 02:14 AM
306 replies to this topic
#261

PokyBro
-
- Members
- 467 posts
Senior Member
- LocationLas Vegas, Nevada
Posted 29 May 2018 - 03:54 AM
1999 F250 crew cab SRW, 7.3 Powerstroke TD
1981 Grandby shortened to a Hawk
Build thread / https://www.wanderth...by-into-a-hawk/
#262
CougarCouple
-
- Members
- 1,376 posts
Senior Member
- LocationLas Vegas
Posted 01 June 2018 - 09:35 PM
Hi PB
Ok I think I get it. I guess I should look up those lagun tables. I assumed you just left the brackets on the table. I will say that we move more than I would like round and round as we go from day to night inside. So you were probably wise to create a space. Have a tall young flexible person on standby to help. 😎
Ok I think I get it. I guess I should look up those lagun tables. I assumed you just left the brackets on the table. I will say that we move more than I would like round and round as we go from day to night inside. So you were probably wise to create a space. Have a tall young flexible person on standby to help. 😎
F250 extended cab, Cougar from ATC. You guys rock thank you!
#263
PokyBro
-
- Members
- 467 posts
Senior Member
- LocationLas Vegas, Nevada
Posted 11 June 2018 - 01:30 AM
Good weekend catching up some more on completing this project.
First let me catch up on some things I meant to include on the last post. On the rear seat box nearest the door, I had to insert and attach two aluminum Chanels, bolted to the side wall, to take the pressure exerted on the box when leaning back on the seat. I also created two brackets out of bed rail angle iron I had handy, to form the seat back supports. Here's a few shots of those.


Seems sometimes you have to back up a little when you find something not quite right. Had the camper off the truck for the first time since I loaded it over a year ago. And when off and I could see the underside, I noticed some slight weathering on the floor pack beneath the door where moisture catches the overhanging part of the bottom during in-climate weather. Even though I had applied a generous amount of marine enamel to the underside when building the floor pack and had the camper upside down, there was still some moisture penetration and slight cracking of the exterior of the plywood along the edge. Hard to believe, but once discovered it need to be addressed. I noticed this when I was adding some 1x4 runners underneath the camper, permanently attached, verses the 1x2 slats I had put in the pickup bed loose originally.


I applied some more paint but didn't feel the paint was going to seal up the cracks very well and they might worsen. Then I remembered what Bombsight had done to his underside floor pack, and decided I would apply truck bed liner as he did. I chose the same brand as Bombsight after reading some reviews. It's called Herculiner, and comes in a kit that includes a roller with two stiff foam roller pads, some scotch bright sanding pad, and a paint brush. The directions call for slight sanding on any glossy surfaces to scuff them up, and then applying a first light coat of the product. After allowing to dry for several hours (1-4), applying a second coat. It went on pretty much that straight forward. You have to wait until the first coat is no longer tacky to the touch, which took about 3-4 hours on a warm day for me. The formulation has small bits of rubber suspended in the solution, and it's a polyurethane base if I remember right. Plan on getting messy and throwing away a set of clothes. Theres no way to apply this stuff on the underside without it dripping down onto you while working. It doesn't come off of skin very well either, if you leave it too long. It was tedious to apply as I had to dob along all the edges of the 1x4 runners, as well as the various angles of the floor pack with the included paint brush, before using the roller to apply in between. But now it's done, I'm very pleased with the outcome.
The floor pack now has a plastic coating sealing up everything really well, and I hope keeping this pretty much maintenance free. Additionally, I now have the runners installed, and a more slide resistant surface as well. Heres a few shots of that.


While that was all drying, in-between I began working on sewing up the seat cushions, which Im happy to be tackling now. I had previously purchased a 32"x82" piece of cushion foam from Galaxy Upholstery Supply in Las Vegas. It's fairly easy to cut the foam utilizing an electric carving knife which I picked up for a few bucks at a thrift store. It works the knife pretty good, but it did the job. The cushion covers turned out pretty good. Cutting out the pieces and sewing them takes a little getting used to again when it's been a while. But I'm getting the hang of it again and they're getting easier.


Well I'm that much closer. The camper will go back onto the truck bed this coming weekend, and I'll permanently mount the seat boxes and the water tank
box, and then start preparing the water system for hookup. Stay tuned.....
Poky
1999 F250 crew cab SRW, 7.3 Powerstroke TD
1981 Grandby shortened to a Hawk
Build thread / https://www.wanderth...by-into-a-hawk/
#264
wuck
-
- Members
- 329 posts
Senior Member
- LocationPollock Pines, Sebastopol CA
Posted 11 June 2018 - 05:47 PM
Nice Pokey!
Very timely for me, I'm starting to work (FInally) on my dinette. Remember back a couple years ago, I went out to the camper to measure and make plans for a dinette only to discover the flood  Ultimately, the dinette was put on hold. Way past thread update time now.
Last time I worked with bed frame iron that stuff was so hard I almost gave up on it. Wonder where that steel comes from? But, it is cheap, especially since it's often laying around the scrap pile!
#265
PokyBro
-
- Members
- 467 posts
Senior Member
- LocationLas Vegas, Nevada
Posted 11 June 2018 - 09:24 PM
Hi Wuck,
Thanks for adding the link back to your post. I do remember your project, and it was interesting to see how you tracked down the leak and solved the problem. I trust it’s still doing fine after all the work you put into it.
Make sure to post your side dinette build when you get it started. I’d love to see what you come up with!
Poky
1999 F250 crew cab SRW, 7.3 Powerstroke TD
1981 Grandby shortened to a Hawk
Build thread / https://www.wanderth...by-into-a-hawk/
#266
Living The Dream
-

- Members
- 464 posts
Senior Member
- LocationFront Range, Colorado
Posted 12 June 2018 - 04:45 AM
Poky.
Great to see the continued progress. everything is looking great. You have fantastic attention to detail!
My youtube channel about my Four Wheel Camper - https://www.youtube.com/c/timmorrissey
All about my camper - https://www.tgmorrissey.com/camper
Item I used in my build- http://bit.ly/TGMorrisseyParts
#267
PokyBro
-
- Members
- 467 posts
Senior Member
- LocationLas Vegas, Nevada
Posted 25 June 2018 - 12:05 AM
Tim, Thanks for your comments. Ive still been enjoying your video postings too.
Well the surge continues. I've been busy over the last week or so with several projects as I near completion. In my last posting, I had begun sewing up the seat cushions, and now they are complete, for a total of eleven between the upper bunk, and the lower dinette/ bunk. I had purchased a large roll of fabric that I figured should have enough, and then some, to complete the arrangement. To my surprise, and delight, it ended up I had only just enough for the last cushion, and wouldn't have had enough for even one more. Good thing I didn't make any serious mess ups. So I truly lucked out. I used naugahyde on the bottom of the upper bunk main cushion, which in hind sight, spared me from running out.
Anyhow, it sure is nice to finally be to this point. I'm pleased with the way they turned out, all in all, and it gives the camper a finished look and feel. Here's a look at how they turned out.


The bed cushions in an up position if needed.

All the cushions laid out to make the lower bunk.
After having all the seat boxes of the dinette out to stain and finish them, I had to disassemble most of the wiring connecting the batteries and solar charge leads. Now the boxes are back in, I put in new wire to replace the temporary scraps I had used before. I added an inline fuse from the battery to the fuse panel, and new wires hooking up the charge controller. I also installed a master shut off switch, and shut off switches for the refer, and the USB charging station/ 12 volt outlet.


Finally, I installed the water system, including the water tank, the electric water pump and switch, and the sink and faucet. I still have to hook up the drain hose and valve to exterior, and that's underway.


That's it for this week. I'm getting ready to head out for a weeks vacation in the camper 4th of July week, so I'm really looking forward to that. Just a few things to finish up during the week, and then stocking up the camper with food, cooking utensils, and filling the refer with cold items. Should be loads of fun!
Poky
1999 F250 crew cab SRW, 7.3 Powerstroke TD
1981 Grandby shortened to a Hawk
Build thread / https://www.wanderth...by-into-a-hawk/
#268
CougarCouple
-
- Members
- 1,376 posts
Senior Member
- LocationLas Vegas
Posted 25 June 2018 - 01:20 AM
Hi PokyBro
Looking good there sir. That lower bunk has a lot of sleeping area for sure. Have fun camping.
Russ
Looking good there sir. That lower bunk has a lot of sleeping area for sure. Have fun camping.
Russ
F250 extended cab, Cougar from ATC. You guys rock thank you!
#269
PokyBro
-
- Members
- 467 posts
Senior Member
- LocationLas Vegas, Nevada
Posted 18 July 2018 - 01:21 AM
On the 4th of July holiday week, I was able to get away for most of the week for a little R&R. This was also my first trip after completing all the finishing of the dinette cabinetry, the new seat cushions, the water system, and the Lagun table set up. I must say it was very comfortable and also satisfying to have things caught up and functioning, as all the systems and appliances functioned perfectly. The solar panel and batteries kept up with demand draw from the 12 volt DC 130 L Isotherm fridge, the ceiling fans, lights, etc. My biggest concern was during the night. I use a CPAP, and I've never had it available until this trip because I didn't have a 12 volt outlet, and my sleep has always been affected as a result. This trip, I was able to run the CPAP at night, along with the fridge, and never ran too low on power, and most importantly, slept much better.
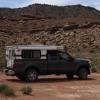
I visited Capitol Reef National Park in Utah, as well as some old familiar sports in Southern Utah. I boondocked for all the camp sights, so below are some photos from that trip.


Camp sight #1, which was at Forsythe Reservoir.


A few shots of Capitol Reef's geologic formations.


On the back side of the central part of Capital Reef's main attraction area, there is a dirt road that drops down to Bulfrog on Lake Powell, called the Notum Road. After about 30-40 miles of washboarded, bouncy roadway, and was only good for about 15mph, this leads you to the Burr Trail Road. You have to go up some switch backs, which aren't a problem for a truck and FWC, but would be a little challenging if pulling a trailer. Once up on top, after a few miles, the road is then paved and takes you over to Boulder Utah, and is part of the Grand Staircase-Escalante National Monument. It's some more beautiful back country, and is administer by BLM. Once in Boulder there is a small Anasazi Indian Museum, which is worth stopping for.


Additional camp sights


I also visited Cedar Breaks National Monument on Cedar Mountain, above Cedar City, Utah. (That's a lot of "Cedar" there.  )
)
)All in all, I had a grand time. Doing it again, I would take it slower, drive less, and do some hiking to see even more.
Poky
1999 F250 crew cab SRW, 7.3 Powerstroke TD
1981 Grandby shortened to a Hawk
Build thread / https://www.wanderth...by-into-a-hawk/
#270
Living The Dream
-
- Members
- 464 posts
Senior Member
- LocationFront Range, Colorado
Posted 18 July 2018 - 02:24 AM
Looks awesome Poky! Gald to see you out and about in the camper!
My youtube channel about my Four Wheel Camper - https://www.youtube.com/c/timmorrissey
All about my camper - https://www.tgmorrissey.com/camper
Item I used in my build- http://bit.ly/TGMorrisseyParts


0 user(s) are reading this topic
0 members, 0 guests, 0 anonymous users

