Thanks for all the help ~ I have pics on my phone, now I just need to download them and post them here ~

Just Bought a Vintage Alaskan 8' NCO and I Have Tons of Questions!
Started by
Grrlartist
, Jan 11 2017 02:20 AM
67 replies to this topic
#12

Grrlartist
-
- Members
-

- 40 posts
Advanced Member
Posted 12 January 2017 - 06:50 PM
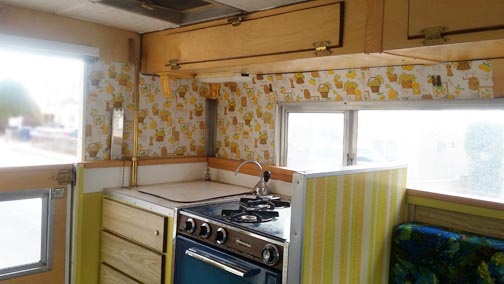
Here's the driver's side view. At first I thought I wanted to make it look more "classic" (more wood, and change the features to resemble a 50's vintage camper), but honestly the early 70's vibe is growing on me. I do really, really like the dark blue appliances ~ and they appear to be in pristine condition. Not a fan of the cheesy contact paper in the galley area ~ but not sure what to replace it with. Maybe just plain brushed aluminum?
#13
Grrlartist
-
- Members
-
- 40 posts
Advanced Member
Posted 12 January 2017 - 07:02 PM
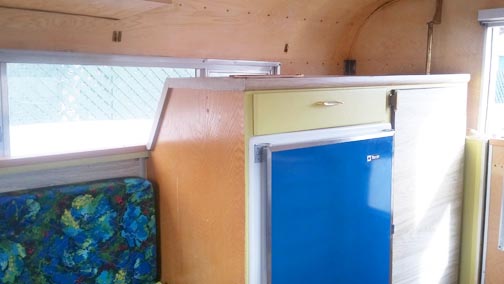
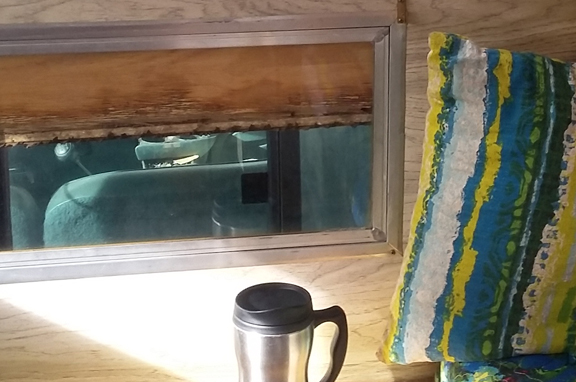
Passenger side rear. This is an icebox, not a fridge, of course. This cabinet is where you can see the yellow/lime paint on the cabinets. That is NOT staying! I have to say though, I love this wild fabric on the cushions, and they look like they are brand new.... Even the foam is in great shape....
Edited by Grrlartist, 12 January 2017 - 07:24 PM.
#14
PackRat
-

- Members
- 680 posts
Senior Member
- LocationNovato, CA
Posted 12 January 2017 - 07:06 PM
Hmm...since the wood on the rear door panel is often where you can see water damage.....and it looks like yours isn't stained or swollen, you may find that the PO just put up the "wallpaper" for a decorative touch rather than to cover stained or ruined interior wooden paneling. Maybe try a hair dryer (AKA = heat gun) to soften and allow you to pull away that stuff. What do you have to lose? Worst case scenario is you have to put back up some stick on "wallpaper" that at least isn't screaming "1970's or something.
More pics please!
OK, the right rear photo shows more paneling that does not show stains in the corners....looking good!
Edited by PackRat, 12 January 2017 - 07:09 PM.
1988 Ford F-250 HD Lariat 4x4 8 Ft. bed
1976 Alaskan 8 Ft. CO camper
#15
Grrlartist
-
- Members
-
- 40 posts
Advanced Member
Posted 12 January 2017 - 07:15 PM
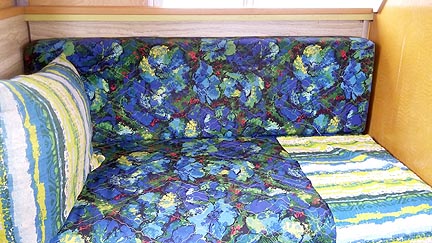
A close-up of the upholstery. It does kinda look like a "modern" 1970's greeting card, doesn't it? The striped fabric is a set of curtains that somebody made much more recently to go with. They're also in really great shape, but I'm not sure how I feel about the combination. Some days I like it and some days I don't!
#16
Grrlartist
-
- Members
-
- 40 posts
Advanced Member
Posted 12 January 2017 - 07:22 PM
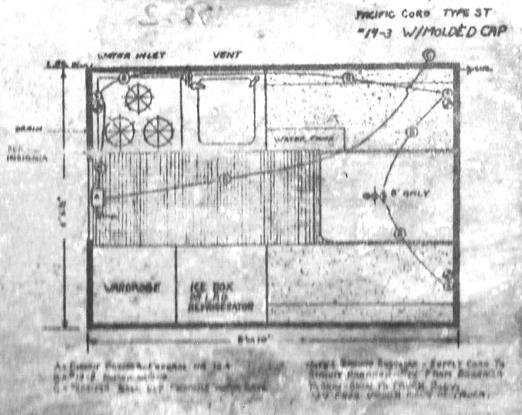
Last photo for now ~ This diagram is glued to a small piece of birch paneling that was in a drawer ~ I can't figure out where it is supposed to go. The corners are rounded and it is about 4" x 10". The image is really yellowed badly (tried to clean up in photoshop with moderate success) ~ but I'm assuming this is a wiring diagram? Also found a small electrical box in cabinet above the sink that just says "15 amp" on it. I can't get my head in there to find out more. Oh, and I found what I think must be the electrical "pigtail" that looks lik it's supposed to allow you to plug into shore power and also draw 12 volt? How would that even work? Next time I am in the camper I willl get a shot of it, too....
#17
Grrlartist
-
- Members
-
- 40 posts
Advanced Member
Posted 12 January 2017 - 07:29 PM
Hmm...since the wood on the rear door panel is often where you can see water damage.....and it looks like yours isn't stained or swollen, you may find that the PO just put up the "wallpaper" for a decorative touch rather than to cover stained or ruined interior wooden paneling. Maybe try a hair dryer (AKA = heat gun) to soften and allow you to pull away that stuff. What do you have to lose? Worst case scenario is you have to put back up some stick on "wallpaper" that at least isn't screaming "1970's or something.
More pics please!
OK, the right rear photo shows more paneling that does not show stains in the corners....looking good!
If the ceiling turns out to be badly stained, I'm thinking I'll pull it down to inspect for damage, and if it isn't refinish-able, I can put up some faux ceiling tile wallpaper..... or even just paint the ceiing panel if it can't be made pretty again....
What's best to replace the ceiling insulation ( kind of assuming the insulation will be trashed about 40+ years in the desert.... ) The rigid foam, or is there something better? I did see that somebody had very carefully caulked the top back edge, maybe to forestall roof leaking....
Edited by Grrlartist, 12 January 2017 - 07:29 PM.
#18
Grrlartist
-
- Members
-
- 40 posts
Advanced Member
Posted 12 January 2017 - 07:36 PM
Okay, I found one more shot ~ this is looking forward with the roof only half lifted.There's definitely some decay there of some kind.... I tried to get a better shot so you can see what's happening. It doesn't look that severe to me, but I'm assuming it will just get worse if not addressed..... any thoughts?
#19
PackRat
-
- Members
- 680 posts
Senior Member
- LocationNovato, CA
Posted 12 January 2017 - 09:57 PM
As they say..."I've seen worse!"
Read more threads on restorations here and yours looks better than many from what I can make out in the pics!!! Oh yeah, read up on the WEIGHT and the GVW info on the door jamb of your truck to see if you are OK there....worst case scenario is some kind soul here will give ya a pointer to two on shocks and springs if you have a 1/2 ton and not a 3/4 ton P/U. Post a pic of that VIN info and the guys can translate that into English.
Get the exterior sealing job done and then get inside and remove the wallpaper and see whatt's what. What you can live with cosmetically and what may be in rough condition...your AK looks really pretty good so far....
Yes....that is "a wiring diagram" but your layout is different (sink/oven & stove locations) so it is a guide not the gospel. Find the manuals posted on WTW and the one identified as for a "1968" will illustrate the pig-tail you found....lucky you! Enlist anyone you know with some electrical know-how and you can test the system with that and access to "shore power". You should also find a smaller socket at the same location for a 12-volt system. The manual will tell you about that powering up the running lights and also how to use the pig-tail to power up the system in 12 volt but you will need 12-volt bulbs....don't forget to swap 'em back to 120 volt if you go back to shore power though!
Anyway, more pics will help the guys who have done restos help identify things in them...a wealth of "been there, done that" knowledge here you can tap into but first....spend time on the WTW AK forums and read EVERYTHING as you will figure out a lot just by doing that. Carpenters have a saying, "measure twice, cut once"....with your new2you camper "read twice, then decide" and by that I mean read the WTW and take notes and then decide how to proceed
Oh, and remember when you raise the roof to reinstall the "pins" and back off on the pump to let them hold up the roof rather than your system!
I managed to get mine to stop leaking, get the stove and the electrical system working and the water and went out and USED it....how far you want to go depends on the condition of your AK and how far you want to go in your restoration....and the cost!
...and now is a great time to remind you to get extra keys for the truck and the AK made and safely stashed where you can get to them in case you get locked out/lose your keys out in Timbuktoo!
1988 Ford F-250 HD Lariat 4x4 8 Ft. bed
1976 Alaskan 8 Ft. CO camper
#20
Rusty
-
- Members
- 931 posts
Senior Member
- LocationPort Angeles, Washington
Posted 13 January 2017 - 01:08 AM
some creative interior decorating....from what I can see...the one corner looks real good and your back door as well....so far so good....
the small piece of thin plywood with the electrical diagram used to be the cover for an electrical circuit breaker box...it slid in a narrow slot to form a sliding door
van gogh-ish cushions..... and lime green/yellow paint  wake up to that in the morning...
the front-top-bottom edge....is damage done from driving in rain and not having pirelli in place...the water also wicks back to the plywood.....damage not so bad....use some CPES penetrating epoxy on it to stabilize the wood....you should be good to go
then...pirelli and o-rings....clean the guides well...some folks have wiped grease on the tracks in an attempt to make the top go up smoother...wrong....a little beeswax and turpentine if anything...grease just attracts dust and dirt..making it more difficult to move
Pack rat is right on the money ......
get your forward and rear gutters caulked with some good quality sealant...i recommend urethane....good bonding and flexible
your "ice box" can be replaced easily with a refer....take a look at some of the newer 12v refers....small brushless motors have made 12v very economical with battery use.....and much safer than propane/electric
That wall paper in the "kitchen" kind of grows on you.....really not that bad...I've never seen a blue stove/oven....some one put some time and money into the decorating...those little stove/ovens aren't cheap...and blue...very special order
Edited by Rusty, 13 January 2017 - 01:13 AM.
2003 Ford 250 Superduty Crew.... 7.3L PowerStroke diesel 1970 10" NCO Alaskan Firestone airbags pulling a 18' Silver Streak runabout


0 user(s) are reading this topic
0 members, 0 guests, 0 anonymous users

