The snow load on the camper is 1000 pounds. That is approximately 3 1/2 to 4 inches of snow.
As to a limit on the weight, I personally would not put more than a 100 to 150 pounds in one area. The roof is designed to handle a load when it is up and when it is down. It is not designed to be lifting any thing close to the load rating. Get too much weight on it and try to lift it and you will end up with a bent roof.
Also be very careful when pushing it up with your new tool. If you have a clamp that is not unhooked outside you could cause some serious damage. Same damage could occur if you don't have the door open for the air to come in while lifting the roof. Just a couple of points to watch out for since you might not feel the resistance like you normally would if you were pushing it up by hand.
What you have made sounds like a great idea. Would like to see it if you ever get a chance to take a picture of it. Might be something we could offer customers with similar problems.


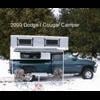
Lifting the top of the FWC
Started by
bluefly
, Dec 13 2006 06:37 PM
39 replies to this topic
#21

benburnett
-
- Members
- 771 posts
Senior Member
#22
camelracer
-

- Members
- 960 posts
Senior Member
- LocationGoleta, Ca
Posted 30 January 2007 - 08:59 PM
Ben,
Thanks for the reply, I appriciate the advice on load limits. The most I would carry is 2 kayaks which should be a little over 100# plus the Yakama racks. The kayaks are usually laying on the beach before the top goes up anyway but it's nice to have the option to camp without unloading.
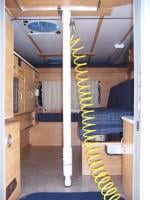
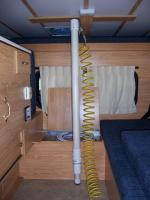
The pneumatic ram is pretty simple. The cylinder is 2" pvc sched 40 pipe with a cap at one end and a 2" x 1.25" sleeve at the other. The piston rod is 1.25" pvc with a cap and 2" cup seal on the end. The cap and sleeve were filed/sanded to get a slip fit. Air goes in through a metal tire valve and lift is controlled by putting my thumb over a vent hole. It is placed between the lifting plate and floor. The ends have rubber non-skid pads but I do need to come up with a better way to insure that it doesn't slip off the lifting plate and damage the headliner or roof.
On a personal note I would like to thank Ben and the gang at ATC for all the good advice and feedback. It's too bad the folks that got my money aren't as responsive. I wish I had known about ATC sooner.
Thanks for the reply, I appriciate the advice on load limits. The most I would carry is 2 kayaks which should be a little over 100# plus the Yakama racks. The kayaks are usually laying on the beach before the top goes up anyway but it's nice to have the option to camp without unloading.
The pneumatic ram is pretty simple. The cylinder is 2" pvc sched 40 pipe with a cap at one end and a 2" x 1.25" sleeve at the other. The piston rod is 1.25" pvc with a cap and 2" cup seal on the end. The cap and sleeve were filed/sanded to get a slip fit. Air goes in through a metal tire valve and lift is controlled by putting my thumb over a vent hole. It is placed between the lifting plate and floor. The ends have rubber non-skid pads but I do need to come up with a better way to insure that it doesn't slip off the lifting plate and damage the headliner or roof.
On a personal note I would like to thank Ben and the gang at ATC for all the good advice and feedback. It's too bad the folks that got my money aren't as responsive. I wish I had known about ATC sooner.
#23
captainkettel
-
- Members
- 185 posts
Senior Member
Posted 31 January 2007 - 01:47 AM
If you get a chance could you post a photo or two of your PCV air operated top extender. Sound like a pretty cool device...Thanks...
#24
benburnett
-
- Members
- 771 posts
Senior Member
Posted 31 January 2007 - 03:11 AM
Thank you for explaining how you put that together.
I really appreciate it.
One thing that you might be able to use so that it won't slip are closet rod ends or something like them. We rigged up a lift for a customer one time with a jack and used a wooden rod. On the push boards on the roof we mounted simple closet rod ends that you would buy at Home Depot so that the wood would not slip out of place as she was lifting the roof.
Something along those lines could probably be rigged up for what you are using.
If you don't have push boards in the camper I will be happy to take some photos of some in a camper for you so that you can see what they are.
#25
camelracer
-
- Members
- 960 posts
Senior Member
- LocationGoleta, Ca
Posted 01 February 2007 - 11:51 PM
Attached (I hope) are a couple of pictures of the pneumatic cylinder in the camper and a disassembled view. Note that the threaded coupling in the cylinder is not neccessary. Since this started out as an experiment I wanted to be able to take it apart for mods and/or repairs.
Attached Thumbnails

#26
craig333
-

- Members
- 8,023 posts
Riley's Human
- LocationSacramento
Posted 02 February 2007 - 06:08 AM
Nice, I assume you have the air pressure regulated so it goes up nice and slow, just in case?
#27
DirtyDog
-

- Site Team
- 3,157 posts
Captain Leisure
- LocationEugene, Oregon
Posted 02 February 2007 - 07:53 AM
Wow!
If you converted that to a potato cannon, you'd make a million bucks!!
If you converted that to a potato cannon, you'd make a million bucks!!
#28
benburnett
-
- Members
- 771 posts
Senior Member
Posted 02 February 2007 - 09:31 PM
If you need the plans for a cannon, I have built one of those. Still have it actually. Set the neighbors yard on fire last year with it. Put a potatoe in it and then dropped a flower spinner firework in on top of that. Worked great except that it didn't go out before it hit a dry spot in the neighbors back yard. We put out fire and neighbor was ok.
Second shot worked much better, waited longer for fuse to burn down some before I shot it off. Didn't have to use water hose for the rest of the night.
Second shot worked much better, waited longer for fuse to burn down some before I shot it off. Didn't have to use water hose for the rest of the night.
#29
craig333
-
- Members
- 8,023 posts
Riley's Human
- LocationSacramento
Posted 03 February 2007 - 08:15 AM
Dont those palm trees burn really well? Brings back some memories I'd hoped to forget
#30
chnlisle
-
- Members
- 3,811 posts
Post Master
- LocationThe Old Pueblo
Posted 03 February 2007 - 06:21 PM
We do love our toys! And I count myself among the "we".


0 user(s) are reading this topic
0 members, 0 guests, 0 anonymous users

