Jump to content


Photo
- - - - -

Rice Build thread!

2012 Eagle shell

  • Please log in to reply
94 replies to this topic

#21 Squatch

Squatch

    Senior Member

  • Members
  • 1,281 posts
  • LocationOn the wrong side of the mountains!

Posted 12 July 2016 - 07:52 PM

My Eagle shell does not have the Yakima tracks. Being a cyclist I'm already heavily invested in rack stuff. Most of it the older rain gutter style. I also have 8 of the Yakima roof mount artificial rain gutters. I've talked with a couple of folks who have used these on their camper with no issues.


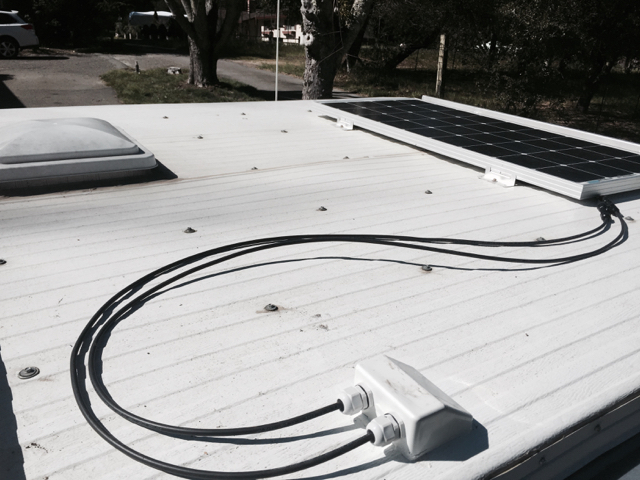
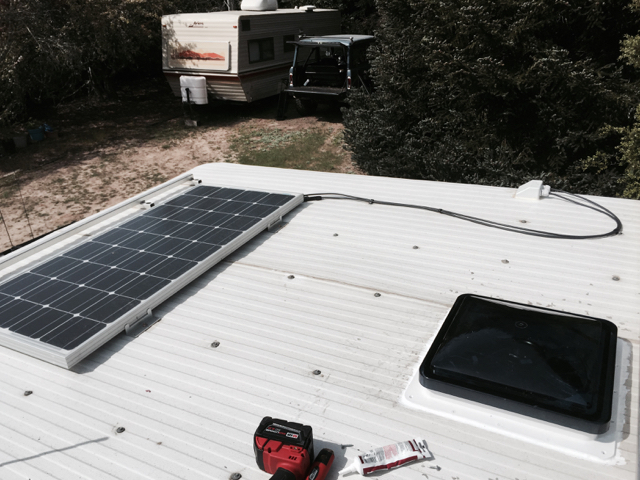
I've ID'ed 6 places along the 2 heavy beams in the roof where they intersect with like sized cross beams. About a foot from each end and in the center. This will allow me to mount 6 feet for 3 crossbars in the strongest spots on the roof. The roof rack will hold the 160 watt solar panel down the passenger side front 2 bars. and the solar shower down the outside of the drivers side forward. This should prevent the vents from shading the panel. It should also allow room to occasionally carry my solo canoe. It also keeps the shower tent forward away from the furnace vent in the rear.


This is the mount style I'll use. The cross bars I have for Yakima are too short so I'll probably get 3 aluminum longer bars to save some weight. I've used these style mounts on quite a few truck caps with no issues over the years. I don't intend to get stupid with weight up there for sure. They will be bolted through the roof and sealed with a Sikaflex type sealant.

foanie031Small.jpg


I need to order some marine grade cabling, connectors, and other small parts for the wiring. Then make decisions on just where to mount the electrical stuff. I also intend to mount an outboard electrical connector on the drivers side rear under the edge of the camper. This will give me a place to plug in the portable panels either in addition to the main panel or instead of. The roof stuff will be easily removable with these mount should the need arise. But also lockable.


Edited by Squatch, 13 July 2016 - 12:52 AM.

  • 0

#22 Squatch

Squatch

    Senior Member

  • Members
  • 1,281 posts
  • LocationOn the wrong side of the mountains!

Posted 14 July 2016 - 07:01 PM

I've been doing some home work the last few days. I think I have found the additional Yakima towers I want. The prices for this stuff on E*** are downright stupid. Often higher than catalog prices on new Yakima stuff. I'm more versed in Thule and have a lot of that as well. It's also made of metal and muh cheaper used. I compared towers yesterday. The Thule's are almost an inch shorter bar height which would be nice. But I would need 4 towers as I only have 2 spares. The Yakima's are plastic, taller and I doubt as strong. But they are strong enough for this. Will be lighter and I can easily get aluminum bar's for them to cut the weight even more. So that's probably the way I'm going.


I checked out my campers wiring yesterday. It is indeed wired for solar to the roof but not to the rear. That's fine. I can add it to the side easily. The wiring is probably adequate for what they do from the factory but far from optimal for my standards. It's 12 gauge with very thin insulation and not real flexy. There is also wiring to the battery box for the charge controller. For now I will use the factory wiring just to see how the system sets up. But may upgrade in the future depending on performance.


In the Eagle Shell the battery and shut off switch is behind the cabinet door in the furnace/stove box. The carpeted ledge on the drivers side opens and inside is the fuse box and the battery separator and wiring. Solar and charge controller wiring are pulled to here as well. There is a circuit breaker on the cabling between the battery separator and the truck charge cable. The fuse box has every circuit fused.


006_zps5904a1c4.jpg


040%20Small_zpscz0pppbk.jpg


I have a couple of questions for anyone that can answer.


What is everyone doing to connect the panels on the roof? I'm not crazy about using an SAE 2 pin up there. Small wire and pretty cheesy in general. Can anyone point me to a junction box that would line up well with the one inside the roof. I like the idea of something like these but they are large and or tape down to the roof.


This would be nice but is large and would be hard to find something to fasten it to in the roof.

https://www.amazon.c...0TTGDASYG6JGKPX


I suppose this could be Pop Riveted to the roof metal in addition to tape or glue.

https://www.amazon.c...0111RNZDY?psc=1


I've found the inside junction box but do not have a roof penetration at this point.


I also seem to remember someone here upgrading the wiring inside their camper from the hinge panel to the Battery/charge controller. But I can't seem to find the thread. Help with that would be appreciated as well.


Just thought I'd add for reference. I did some cable tracing.


The charge cable from the truck comes into a circuit breaker then to the battery separator. The house battery is wired to the other terminal of the separator. A white wire leaves the same terminal and goes to the main cutoff switch and then back to feed the main side of the fuse panel. So the main cut off does NOT affect battery charging. Only the main feed to the fuse block.


The battery has to have the cables removed to really disconnect it.


Edited by Squatch, 14 July 2016 - 07:11 PM.

  • 0

#23 fatmab

fatmab

    Advanced Member

  • Members
  • PipPipPip
  • 43 posts

Posted 14 July 2016 - 07:30 PM

I believe this is the thread you seek about the wiring upgrade


http://www.wanderthe...r-solar-panels/


Here is my writeup that I just recently finished where I installed the same Bogart setup in my Hawk.  I also ran the wiring similar to the above link.


http://www.wanderthe...-solar-upgrade/


  • 0

#24 norcalhusky

norcalhusky

    Advanced Member

  • Members
  • PipPipPip
  • 96 posts

Posted 14 July 2016 - 07:33 PM

I used a similar product for the roof entry:


IMG_4693.jpg


IMG_4700.jpg


IMG_4801.jpg


Heres the link to the pass through: https://www.amazon.c...1?ie=UTF8&psc=1


The wire I used: https://www.amazon.c...0?ie=UTF8&psc=1


  • 0

#25 Squatch

Squatch

    Senior Member

  • Members
  • 1,281 posts
  • LocationOn the wrong side of the mountains!

Posted 14 July 2016 - 08:58 PM

Thank you both.


Nice jobs BTW!


  • 0

#26 Squatch

Squatch

    Senior Member

  • Members
  • 1,281 posts
  • LocationOn the wrong side of the mountains!

Posted 15 July 2016 - 12:08 AM

I was reading Fatmab's thread and the light bulb went off. I have a choice of several different 90* thru hull boat fittings that could be used to route wire through for the roof penetration. These are just laying in a box in the basement. So I checked a couple of them out.


This one will bolt through up to an inch of thickness. A true 90 is a little tight for wire routing compared to an electrical specific elbow with a more gradual sweep. But it works. A squirt of caulk in the hole and the wires are sealed. These are 10 gauge auto wire just for a trial. This should work fine. It is actually a thru hull fitting for a bilge pump on a boat. I think I would have no problem getting 8 gauge through it if I went that route.


001%20Small_zpss8zttreo.jpg


Same thing in white.

http://www.westmarin...e=c&matchtype=e


I also have several tubes of Polyurethane caulk. Pretty much the same thing as Sika-flex just a cheaper contractor brand. Color is cedar tan because it was bought for my log home. I'll use it as a sealant. Like the above fitting is has long since been paid for and won't show much on the roof anyway.


Edited by Squatch, 15 July 2016 - 02:05 AM.

  • 0

#27 Squatch

Squatch

    Senior Member

  • Members
  • 1,281 posts
  • LocationOn the wrong side of the mountains!

Posted 29 July 2016 - 04:37 PM

Just to answer a question that came up previously.


Yes Truckfridge does sell the 12 volt cable plug assemblies separately. I just ordered one today. $25.


In my case I'll cut off the lighter plug and install an Anderson power pole. That way I'll have the stock set up if needed for another vehicle. 


Lot's of cable, connectors, and rack parts on order. I hope to be testing some solar stuff real soon.


Edited by Squatch, 29 July 2016 - 04:38 PM.

  • 0

#28 Squatch

Squatch

    Senior Member

  • Members
  • 1,281 posts
  • LocationOn the wrong side of the mountains!

Posted 13 August 2016 - 10:20 PM

Well I'm sorta getting started on the build. I got the camper up from the back yard and in the drive. Washed it good yesterday/ The roof was filthy after being down under the trees.


I pulled all the loose stuff out of the interior to make room for moving stuff around and working.


I found the junction box in the ceiling for the solar stuff and everything else.


1st I had to pop loose the inside lifting struts. Then remove 6 screws to drop the front lifting board.

c07_zpsouskkyi3.jpg


002%20Small_zpsz2ifzb4r.jpg


Inside is a ground buss bar. This verifies they use the frame for ground like most cars. Looks like FWC forgot to tighten one of the mounting screws. I hope that's all they missed. The 2 yellow crimp connectors are for the solar panel back to the electrical area under the side ledge.

001%20Small_zps3ikgarbi.jpg


I think I've figured out where to mount the rack pads on the roof. Blue tape in 2nd pic marks the center bar location. Front and rear roof rack bars will be about 45" either way from this. Roof vents will be between the bars. The bars should be pretty much centered with the windows in the canvas. Which will offset the entire rack system rearward just a bit.

001%20Small_zps67csdwrb.jpg


I had to order a few more small parts for the wiring. But they should be here Wed. In the meantime I'll work on mounting the rack feet on the roof and the solar panel.


Now if we could just get the heat out of the stupid range. Temps high 90's and humidity over 75%. Not much fun for working outside.


Edited by Squatch, 13 August 2016 - 10:29 PM.

  • 0

#29 Squatch

Squatch

    Senior Member

  • Members
  • 1,281 posts
  • LocationOn the wrong side of the mountains!

Posted 16 August 2016 - 04:53 PM

I made some real progress. The Yakima top loaders have been installed.  Trying to get the spacing right for these was quite trying. Too many things in the way like interior lights and roof vents and maintaining clearance on the inside for for the folded up end walls when the roof is closed. I ended up with a wider spacing between the front and center racks than between the center and rear racks. But that's fine. It'll just look a little asymmetrical.

So once I figured out where all the brackets were going to mount I marked the locations on the inside so I could use the ceiling strips as a drill guide.
009%20Small_zpsux0c9fea.jpg

I drilled pilot holes and then rechecked the spacing on the outside.
011%20Small_zpsjszbpxgn.jpg

Once that was done I used the proper bit and opened up the holes. Then I loosely bolted all the brackets in place for yet another check.
018%20Small_zpsvk2o0s2w.jpg

Regular nuts for the test fit. I cut 1/4" off the bolts with a cutoff wheel in a Dremel. Then used Nylock nuts for the final install. Tightened to just snug. I didn't want to crush or damage the beam in the roof.
015%20Small_zpsylrjknha.jpg

I then masked around the brackets and removed them.
021%20Small_zpszlsrbzuh.jpg

The area was wiped down with solvent as were the brackets. I want the caulk to stick and I don't want leaks or to do this job again. I'm using a urethane caulk that is similar to Sikaflex. Not only will it seal but it will glue the brackets to the roof. All the brackets were bolted in place with Marine grade stainless steel hardware. The bolts are not a high grade bolt. Probably around grade 2 or 3. But I figure that's enough considering I'm bolting to a roof beam that not much more than a beer can covered in tin foil. Other than the solar shower and the solar panel I don't plan to carry much more than a light canoe occasionally. That's another reason for using 3 bars. To spread the weight over the roof. The bars will also give me a place to lash a tarp for an awning if needed.

Tan caulk because like so much else I'm trying to make use of stuff I already have on hand.
024%20Small_zpss3gfbqlu.jpg

Just to be sure about leaks.
022%20Small_zpsvgn7pzfd.jpg

Installed.
023%20Small_zpsqrxfbh6x.jpg

025%20Small_zpsdpajye9o.jpg


  • 0

#30 Squatch

Squatch

    Senior Member

  • Members
  • 1,281 posts
  • LocationOn the wrong side of the mountains!

Posted 16 August 2016 - 05:05 PM

I found this when I brought the camper up from the backyard. Some critter has been gnawing on it. This part of the camper will get a couple of coats of bedliner soon.
001%20Small_zpsqdy19x9a.jpg

The electrical stuff is hidden underneath this bench in the shell models.
008%20Small_zpsmvafpahw.jpg

Fuse box, battery separator, loose wiring for the solar panel, and the long wire goes forward to connect to the truck battery. I figure I'll probably mount the solar charger controller here as well.
003%20Small_zps4loskr0a.jpg

I'll let the caulk on the roof mounts cure for a couple of days before attaching racks. Then on to the solar stuff. I think I'm going to run up and pick up my group 31 deep cycle storage battery in a while.


Edited by Squatch, 16 August 2016 - 05:08 PM.

  • 0


0 user(s) are reading this topic

0 members, 0 guests, 0 anonymous users