Jump to content


Photo
* * * * * 2 vote(s)

Vic's new 2012 Puma build


  • Please log in to reply
209 replies to this topic

#161 Vic Harder

Vic Harder

    Doctor Electric

  • Site Team
  • 4,985 posts
  • LocationCalgary, Alberta

Posted 21 April 2020 - 07:12 AM

OK, more Reflectix work on the ceiling.  Once the passenger side was done and the fabric reattached (used more double sided tape and a few staples) I removed the few staples I had put on the driver's side and carefull pulled the fabric off of the double sided tape. I detached the middle too, so it would be exposed and easier to work with.

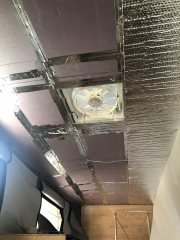
Getting ready to install driver's side Reflectix


I then did lots of careful measuring to locate the wires that had to come through later.  In hindsight, I could have made even more measurements.  With the Reflectix, I lost the ability to "feel" the wires and existing screw holes in the roof.  Finding them once the Reflectix and the fabric were back up required using the measurements to get within a 1/4" of the spot, and then using a thin needle to poke upwards until I found the holes. 
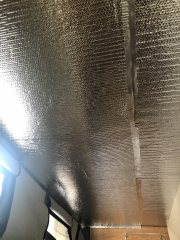
Reflectix in and sealed


To make holes for the wires I used two different methods.  Feel the wire and use the measurements, then cut the Reflectix with a knife, or use a hot soldering iron to melt a hole.  In both cases, I then sealed the hole again with aluminum tape.  I do NOT want air/water vapor leaking through my roof!  I started in the middle of the camper and worked out to the edges to avoid puckers.  I pulled HARD on the Reflectix before pressing it into the tape and adding a staple for good measure.

 
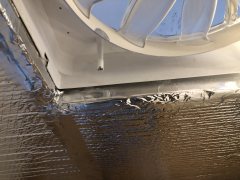
I spent extra time to seal up the fan area.  
Sealing the fan area


Here is the Reflectix with the wires found and taped up again:
Fan sealed and holes made for wires


Before reattaching the fabric, I added more double sided tape on the Reflectix along the driver's side edge.  I started attaching the fabric in the middle of the driver's side edge... again, pulling hard to avoid sags/puckers and again pressed the fabric into the tape and added a staple.
 
As I went along, I made holes in the fabric for the wires with the soldering iron.  The fabric has enough plastic fibers in it to melt VERY easily, and also to self-seal the edges so they don't fray.  This is much stronger than slicing a hole in the fabric, which can then easily tear further along the cut.
 
(Sorry, no pic of that!)
 
I did snap a few shots of the parts where the new fabric meets the old.  This is the driver's side rear corner.  The "new" piece of wood that goes east/west hides the edge of the new fabric along the hinge, and covers where it meets the old fabric in the corner.  Double sided tape under the wood strip (cut from a sheet of 1/2" maple plywood as shown in a previous post) in the corner area keeps it from pulling loose.
Drivers rear finishing detail


Similar pic of the passenger rear corner.  I still need to trim that little bit of foil/fabric that can be seen peeking through at the very edge.  That edge is also yet to get a wooden strip of its own... tomorrow?
Passenger side finish detail


  • 0

#162 Happyjax

Happyjax

    Senior Member

  • Members
  • 1,444 posts
  • LocationMaryland

Posted 21 April 2020 - 11:26 AM

Outstanding work Vic!


  • 0

2018 Ford F-250. Customized Bundutec Sable :)


#163 jimjxsn

jimjxsn

    Senior Member

  • Members
  • 599 posts
  • LocationRoxborough Park or Buena Vista CO

Posted 21 April 2020 - 05:16 PM

Well done Vic!  I hope you are happy with it, that is a bunch of work.


  • 0

~Jim
2000 Tundra AC- 2000 FWC Ranger

2017 Tundra DC - 2017 ATC Panther


#164 BlueSky

BlueSky

    Senior Member

  • Members
  • 160 posts

Posted 22 April 2020 - 11:22 PM

Nice work.  With the original fabric up there, you have the space between the metal roof and the fabric able to breathe.  With refletix it looks like you are sealing it off.  Might be fine, but I wonder about condensation.  Then maybe you left some areas open so it can breathe, and I missed it in this post.  Maybe I should just shut up.


  • 1

#165 Boonie

Boonie

    Senior Member

  • Members
  • 193 posts
  • LocationBrighton, Colorado

Posted 23 April 2020 - 02:22 AM

With my simple understanding of home insulation, the vapor barrier always goes on the warm side, so that condensation does not penetrate into the insulation and potentially freeze. Or in Vic's case prevent the moisture from reaching the insulation space and condense against the outer roof skin and trapping water above the ceiling cloth.


  • 0

#166 Vic Harder

Vic Harder

    Doctor Electric

  • Site Team
  • 4,985 posts
  • LocationCalgary, Alberta

Posted 23 April 2020 - 08:04 AM

Boonie has the gist of what I was after, a vapor barrier on the warm (and thus wetter) side, just like in a tightly sealed house.  Maybe you missed something BlueSky, but the old fabric was removed, except for the tiny 2" x 4" corner sections.


Edited by Vic Harder, 23 April 2020 - 08:22 AM.

  • 0

#167 BlueSky

BlueSky

    Senior Member

  • Members
  • 160 posts

Posted 23 April 2020 - 02:32 PM

Yes, vapor barrier on warm side is good.  I guess the reason I am thinking about this is because I m doing a remodel on my house and I've learned more about vapor barriers and cavities than anyone should know..  A vapor barrier goes just behind the drywall and over the insulation.  However, a "Water Resistant Barrier" or WRB (like Tyvek) goes on the exterior sheathing and behind the siding.  The WRB can breathe, but also sheds moisture.  The sheathing and cavity is allowed to breathe through the WRB.  I suppose if there is no way for warm moist air to get into the camper roof cavity then it is a non issue.


  • 0

#168 Vic Harder

Vic Harder

    Doctor Electric

  • Site Team
  • 4,985 posts
  • LocationCalgary, Alberta

Posted 23 April 2020 - 08:36 PM

Yes, vapor barrier on warm side is good.  I guess the reason I am thinking about this is because I m doing a remodel on my house and I've learned more about vapor barriers and cavities than anyone should know..  A vapor barrier goes just behind the drywall and over the insulation.  However, a "Water Resistant Barrier" or WRB (like Tyvek) goes on the exterior sheathing and behind the siding.  The WRB can breathe, but also sheds moisture.  The sheathing and cavity is allowed to breathe through the WRB.  I suppose if there is no way for warm moist air to get into the camper roof cavity then it is a non issue.

Thanks for that insight.  I wondered about Tyvek.  I was thinking it was a vapor barrier and it made no sense to me to put a VB on the outside of the insulation.  Seems like Tyvek is more like Goretex, a breathable and waterproof material.


My seal isn't perfect, especially near the hinges at either end.  But other than that, there is no way for moisture from inside the camper to get into the insulation.  Condensation will still happen where there is thermal bridging, but that is unavoidable with a metal framed camper, I think.


  • 0

#169 Vic Harder

Vic Harder

    Doctor Electric

  • Site Team
  • 4,985 posts
  • LocationCalgary, Alberta

Posted 23 April 2020 - 08:36 PM

Yes, vapor barrier on warm side is good.  I guess the reason I am thinking about this is because I m doing a remodel on my house and I've learned more about vapor barriers and cavities than anyone should know..  A vapor barrier goes just behind the drywall and over the insulation.  However, a "Water Resistant Barrier" or WRB (like Tyvek) goes on the exterior sheathing and behind the siding.  The WRB can breathe, but also sheds moisture.  The sheathing and cavity is allowed to breathe through the WRB.  I suppose if there is no way for warm moist air to get into the camper roof cavity then it is a non issue.

Thanks for that insight.  I wondered about Tyvek.  I was thinking it was a vapor barrier and it made no sense to me to put a VB on the outside of the insulation.  Seems like Tyvek is more like Goretex, a breathable and waterproof material.


My seal isn't perfect, especially near the hinges at either end.  But other than that, there is no way for moisture from inside the camper to get into the insulation.  Condensation will still happen where there is thermal bridging, but that is unavoidable with a metal framed camper, I think.


  • 0

#170 Vic Harder

Vic Harder

    Doctor Electric

  • Site Team
  • 4,985 posts
  • LocationCalgary, Alberta

Posted 26 April 2020 - 06:01 AM

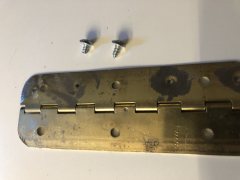
A bit more progress.  With the bed area now being 5' deep permanently, the push bar at the front of the camper was less than useful for raising the top.  I needed a longer bar.  The stock bar was also too flimsy to lift the roof with a 330W solar panel up there, even with the 80# shock lifter thingys.  I had a piece of 3/4" piano hinge and a piece of aluminum channel lying around that was just the right length, so I figured this just needed to be done today.


Hinge cut and shaped to avoid sharp edges

3/4" hinge


with shortened 3/8" #8 screws

I used 3/8" long #8 metal screws, but even those were a touch too long and would scratch the topmost life panel unless I trimmed them a bit with my grinder.


IMG 1932
Hinge in place (sharp eyed folks might notice this is a longer piece..... previous piece got inserted and taken out enough times that I stripped the screw holes.  New one just went in the one time.  There is a piece of 1/2" plywood behind the hinge so I don't screw or drill into the lift panel.
 
IMG 1937
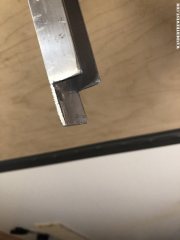
This is the C-channel I used... 3/4" x 1 1/2"
 
IMG 1936
I trimmed the end of the channel so it would fit nicely onto the 3/4" hinge.  3 holes drilled into the aluminum, and then "threaded" by driving in a sacrificial screw.  Once the actual screws were in place, I trimmed off the excess length in the back so make that surface nice and flush... sorry, no picture.
 
bar in place

Bar in place.  Held up by the same mechanism that the factory used.  It is much higher than the original bar, and so it is less likely that we will knock our heads on it.  The wife is quite enthused about the change.


Edited by Vic Harder, 26 April 2020 - 06:04 AM.

  • 0


0 user(s) are reading this topic

0 members, 0 guests, 0 anonymous users