My hunch is that this is likely not worth the effort/mess. The thermal transfer through the frame is almost all through conduction through the tube itself. The thermal conductivity of aluminium is ~230 W/mK (about the best thermal conductor besides diamond), where as air is around 0.03. W/mK + convection and radiation. Filling the the tube with foam will stop convection/radiation, but that is likely small relative to the conduction through the tube itself. The tubes could become slightly more rigid, but again likely to by an insignificant amount.
That said, I don't know if FWC foam filled the tubes on my camper, so far I have not had to look inside them.
Thanks rando. I dislike cleaning up expanding foam that gets out of where I wanted it... super messy. I wondered if it was worthwhile, as it may be done to stop water from running along the tubes.
I had a quick discussion off line with Tim Morrissey, looking for advice and know how on the ceiling repair. His videos are excellent, and this the most relevant one for what I wanted to do:
I already have new headliner from the wonderful folks at ATC. The nice thing about this headliner (same as original) is that it is wide enough that there isn't a seam down the middle. I was very curious to know about stuff Tim didn't cover in his video, because his roof lifters and canvas were in really bad shape so he wasn't fussy about how it all came apart. I wanted to know how to actually remove the roof without causing any damage. I was thinking of this sequence:
1) Build supporting mechanism to hold the roof up
2) unscrew bottom of lifting panels (not sure how to hold the springs so they don't unwind)
3) remove trim screws around outside of roof
4) remove trim
5) peel off the roof from the frame without damaging the sideliner
6) peel off the thermal pack header
7) remove existing headliner
8) lift roof off of camper
9) drill out all the rivets holding the lifter panels to the ceiling
11 remove/enhance stock wiring (I hate the frame grounding mechanism that the factory uses)
12) replace insulation, tape/seal it to create full vapor barrier
13) Install new headliner
14) reinstall thermal pack header
15) reinstall roof - sealing sideliner to roof
16) reinstall lifter panels to roof
17) reinstall trim & screws
I was also wondering about glues/sealants in use that I have to replace when reinstalling, and how to remove the existing glue/sealants on disassembly without damaging anything.
Finally, I wondered about all those darn rivets they use to install the roof lifters into the roof. They use screws at the bottom and rivets on top. Why?
After chatting with Tim, we both agreed that since my sideliner, lifters and roof were in good shape, it made no sense to remove the roof to replace just the headliner.
So I cut out the remaining headliner, leaving just 1/8" or so along the edges. The aluminum tape I used stuck well to the aluminum tubing and the bits of headliner that remained behind. There are just 4 small sections of the original headliner left, one in each of the four corners of the roof. When I get close ups, you will see why. It has to to with how I plan to attach the new headliner without taking off the lifter panels.
The rigid insulation was cut snug using my table saw. I left 1/2" of the rockwool that was up there between the roof and the rigid stuff, so the total R value should be around 7 or so. (1" or Rockwool, plus the R-5 of the 1" thick rigid stuff).
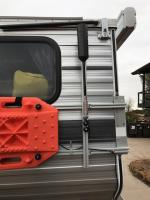
One odd bit. Each of the N/S tubes is bent as shown below. Possibly to decrease the height of the roof to allow it to slope downwards at the ends for better water flow.
One odd bit. Each of the N/S tubes is bent as shown below. Possibly to decrease the height of the roof to allow it to slope downwards at the ends for better water flow.
It looks like the E/W tubes at the end have a smaller diameter, so the N/S tubes need to be crimped to line up. I wonder if this is to accommodate the lift panel thickness when closed?
Like all good projects, this one seems to be mushrooming a bit. In that spirit, and while you are in there, have you thought of running some always hot wires to the bed area for switched reading lamps? I have alway thought a focused lamp over the bed would be better for reading than the Operating Room Bright LED strips.
Also, don't you have a cell booster? Any thought of running some thin coax up there for the antenna for that? It would work nicely in the middle of that huge ground plane, and be nice and high while popped. Something like this:https://smile.amazon...r/dp/B00LP25IYK
As rando pointed out, the N/S tubes are crimped at each end to attach to the 1” E/W tubes at the front and back. On my 1981 Grandby, the N/S tubes were only 1” the full length. FWC later moved to a 1 1/2” N/S tubes for increased strength, and they also have a slight bow over their length. I can attest they are stronger, as mine was a little concave when I got it due to the weight of repeated snow loads. I came up with a creative idea to add 5 more 1” N/S tubes attached side to side with the original single tubes to provide greater strength to withstand snow load, and was able to turn the roof upside down and reapply a slight bow in the roof. The downside was it added a bit of extra weight to the roof, but still manageable. Be glad yours has the 1 1/2” rectangular tubes, remaining light, but with increased strength.
As rando pointed out, the N/S tubes are crimped at each end to attach to the 1” E/W tubes at the front and back. On my 1981 Grandby, the N/S tubes were only 1” the full length. FWC later moved to a 1 1/2” N/S tubes for increased strength, and they also have a slight bow over their length. I can attest they are stronger, as mine was a little concave when I got it due to the weight of repeated snow loads. I came up with a creative idea to add 5 more 1” N/S tubes attached side to side with the original single tubes to provide greater strength to withstand snow load, and was able to turn the roof upside down and reapply a slight bow in the roof. The downside was it added a bit of extra weight to the roof, but still manageable. Be glad yours has the 1 1/2” rectangular tubes, remaining light, but with increased strength.
Poky
Good to know. My Puma has a very noticeable crown to it, vs my Hawk which was flat (at least by the time I got it).
It looks like the E/W tubes at the end have a smaller diameter, so the N/S tubes need to be crimped to line up. I wonder if this is to accommodate the lift panel thickness when closed?
Like all good projects, this one seems to be mushrooming a bit. In that spirit, and while you are in there, have you thought of running some always hot wires to the bed area for switched reading lamps? I have alway thought a focused lamp over the bed would be better for reading than the Operating Room Bright LED strips.
Also, don't you have a cell booster? Any thought of running some thin coax up there for the antenna for that? It would work nicely in the middle of that huge ground plane, and be nice and high while popped. Something like this:https://smile.amazon...r/dp/B00LP25IYK
Love the ideas.
1) Reading lights. I think we were almost on the same page. In the first pic in the above post you can see wires over both the foot and head end of the bed area. I was planning on putting the stock light fixtures there with Yellow LED's for nighttime excursions to the bathroom (aka 3 gallon bucket). Focused reading lights would be another option! I'd love to see an amazon link to something that would be flat/shallow enough to be used in the bed area.
2) Antenna... now, there is another good idea. I hate to admit that even though my tech training back in the early 70's was on microwave data transmission, I am not that clear on how cell antennas work. I have a weboost trucker antenna mounted to one of the rear lifting brackets. I can lower it for driving. I can't see putting a big antenna up on the roof permanently... Would the signal strength be significantly better with this antenna with a big grounding plane? How would you envision mounting it?
Most of the time in the USA I am on Verizon 4G, which the 301104 lists has having +2 dB of gain. The 4G-OTR has at least 2.5 or maybe even 3.5. This antenna also has a "built in ground plane" so wouldn't benefit from being mounted to the middle of the roof.
I am now wondering about their directional antenna, and getting that (although I haven't needed it yet). This also has a built in ground plane.
As for a light, I didn't have anything in particular in mind, but something like a chart light would be cool as you could shine it on your book without disturbing your partner. We used to read by headlamp, then switched to light up kindles, which is another approach. I used this one on a prior camper.
I also use the OTR antenna with an extendable mount to drop it below the roof line when we don't need it, and above the roof line when needed:
As you note, the OTR doesn't need a ground plane, which is why I used it, but it definitely has some unintended directionality because of the metal camper only being on one side. Maybe an antenna above the camper, on a nice big ground plane wouldn't have this issue? Probably not worth the effort though.
If you did want to do this, by using an NMO mount you can screw on any type of antenna you want, so be future proof for 5G, or regress back to ham radio if you get really bored.